This is the multi-page printable view of this section. Click here to print.
User Guide
- 1: Which Domains to Add
- 2: Definitive Guide to Sites
- 3: Logging
- 4: The Double Sync Problem
- 5: Flush States
- 6: Backup and Restore
- 7: App Pages
- 7.1: Safety Keywords
- 7.2: Sites, Scanning and Options
- 7.3: History
- 7.4: Resetting the Admin Password
- 7.5: ASNs
- 7.6: ASN Database
1 - Which Domains to Add
Sadly, this isn’t an exact science, but making a start is easy, then dial it in.
Or ask about if there’s any other users for a site you want
The Golden Rules for finding domains are:
- It’s ok to add too many domains temporarily, but apply some common sense
- Don’t and any Google/Amazon size sites or things that might be used by other sites
- Removed domains you don’t need afterwards.
- If you go “all in”, make sure you put in the effort to prune the list afterwards, it will cost you in the long run.
- Don’t forget cookies and a hard refresh/browser close/re-open when testing
Add
- Anything <something>.<\website-you-want>.domain
- Things like “static.hx-sedn.domain” where"hx" seems to relate to the site you want to add (abbreviation etc)
- For “Manual” users - If there’s a domain that’s loading a lot of content image/videos etc
- Look in the “File” column in Developer Tools - if it isn’t related to Google/AWS etc and just seems to be a random domain (like “tt-rr.domain”, add that as well)
Avoid
- Anything Google/Microsoft/Apple/Cloudfront/Cloudflare etc (hint: gstatic is one of Google’s)
- Anything that doesn’t really relate to the domain, this is really a judgement call
- Common (Internet wide) Libraries:
- These can be hard to spot at first, but you’ll spot the common ones quick)
- These appear on loads of sites, these won’t block your site, but you don’t want to add them to the VPN for speed reasons:
- “jsdeliver / jquery and similar sites unless it’s jsdeliver.<the-domain-you-want>
- “getbootstrap”
2 - Definitive Guide to Sites
There’s a lot of things that can happen when trying to add a site.
This page can look scary, there’s a lot of options, you don’t need them all
Remember - once you lock a site in, it’s pretty solid.
And if you do get stuck, other users may already have a list they can give you
This guide tries to cover most scenarios, some steps won’t be necessary, but they’re there for completeness.
Be aware that clearing your cookies and restarting/trying another browser can really help
In testing a few users insists that a new site won’t hit the VPN for15 minutes after a Sync. They’ll report that they closed their browser, but couldn’t reproduce on a video call when the browser was closed.)
Flush States
In Settings, the Flush States option will flush any active connection on Sync For troubleshooting, this can clear up issues prevent them being hidden
Generally, you want:
- On for site testing
- Off at all other times
Scanner Issues
Sites that won’t Scan
Things to try:
- First off - be certain the site works over a normal full VPN client. If doesn’t, there’s nothing that can be done here.
- Adjust the Flush States option
- Try adjusting the User Agent in settings and rescan
- There’s lists of common browser agents at What is my browser.com
- Add the site as is to the list, Sync and try again
- Do a second sync, then try a forced refresh in your browser (Ctrl + F5/ Shift + F5/Command + F5 depending on your browser)
- If you were getting “flat out block” page in your web browser (e,g the page just says “403 Unauthorized” or plain “Not in your country” message) and you’ve run two Syncs -
- Ensure Flush States is on, and run another Sync
- Close your browser and open it again/try a different browser just for testing - sometimes “Established” TCP/IP will stick for a few minutes.
- You can check the IP of the site your browser is using from Developer Tools in the Browser and compare to the alias, but it’s easier just to proceed to the next step:
- If you’re still getting:
- Scan results back but it’s not fixing it, head down to Unsafe Scan
- An error (e.g. 403 etc) have a look at: Manually Looking for Site Domains
Unsafe Scan
Sometimes sites will use scripts to call extra domains, these won’t show in a normal scan, but probably will in an Unsafe Scan.
This type of scan will find every “http:// or https://” links in the page, you may, or may not, see extra domains in there.
- Revisit the Scanner page
- Uncheck the “Safe Scan” box
- Run the scan again - you should get a bigger list of domains
For guidance on which domains to add, refer to the Guidance on which domains to add page here
If that doesn’t do it after a Sync/Cookie Clear/Hard Refresh, have a look below at manually finding the domains.
Manually Looking for Site Domains
This is the most reliable way to do it if the scanner doesn’t work. It’s a bit of poking about but it’s easier than it looks.
The easiest way to find list of domains is from the web browser
-
Open the site (even if it doesn’t work)
-
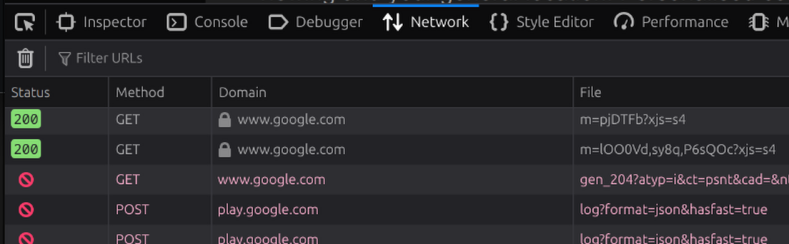
Press F12 to open the Developer Tools in your browser
-
Find the “Network” Tab
-
Reload the page so that the Network tab shows all the connections
-
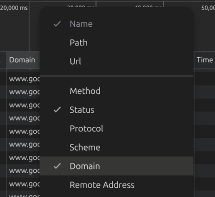
If you don’t have a “Domain” column in there, right click the columns at the top and add it in
-
Sort the Domain list alphabetically
-
Have a look through the list, you’ll see there’s lots of common site in there
-
If you’ve got an adblocker, you can ignore any lines that show up in red. That’s it doing it’s job
-
Select the domains you need - have a look at the Guidance on which Domains to Add section below, and then come back here once you’ve made your choices.
-
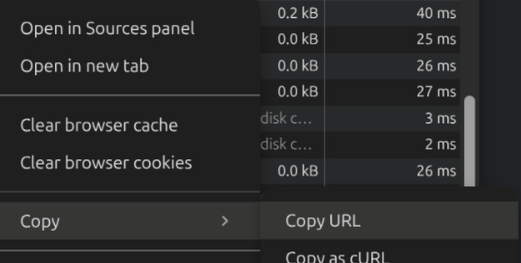
To copy the domain so you can paste it in, right click a domain and select “Copy -> Copy URL” then paste the full link Site -> Add Site function in Synclias to add it, it’ll work out the domain from the full link.
-
-
Once you’ve done that, run another Sync
-
Before you try to access the site again, it’s best to delete any cookies from the site, some mark your browser with a cookie that sticks, even if you’re going over the VPN.
-
Make sure the Sync is complete
-
In your Developer Tools in the browser:
- Depending on your browser:
- Firefox - Storage Tab
- Chrome Basked - Application Tab

- Look for any cookies from the site
- Right click -> Delete/Clear them
- Depending on your browser:
-
Then hard refresh the browser (Ctrl +F5/Shift+F5/Command + F5 depending on your browser)
-
3 - Logging
At this time, Synclias collects historical data during a scan, and records results. During development, it may crash, and not record a log, but these cases should be rare.
Active logs are written to the console on each Docker container and can always be monitored there in real-time
Finding the Container Names
To find the container name, use a Terminal window to run:
docker ps
You will be presented with a list of running containers. By default the last column is “Name”:

Viewing Logs
To watch the logs on a container, run the command:
docker logs -f <container-name>
The two main containers to watch for logs are:
- Worker - where syncs and all back end processing happens
- App - Web front end
e.g the logs for the Worker will look as follows after it starts up.

Some useful info appears in this log:
- Parent-Child scan results - if you want to see how a site got discovered
- Alias contents
- Site scanning/DNS issues
4 - The Double Sync Problem
When normally installed, Synclias has the same access to sites as any machine on your network, which means that if a site is blocked completely, the scanner doesn’t function.
This causes what has been termed the “Double Sync” problem, where two Syncs are required to get a site to work completely. It’s more of an inconvenience but if a site isn’t working after a Sync, it’s worth bearing in mind.
Sites this Affects
They’re fairly rare, mainly it’s any site that doesn’t return anything back at all apart from the text “Not available in your country”
If a site shows a website but then warns about your location, or something else blocking it, you should get some decent results on the first time through.
Example of the Double Sync Issue
As an example, lets say:
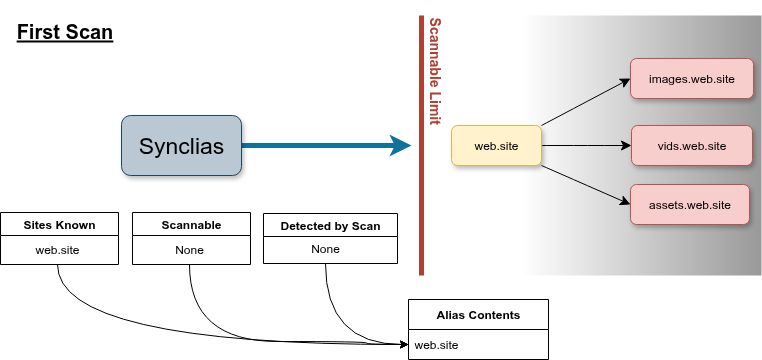
- There’s a site you want to access: web.site but it’s completely blocked by IP.
- This site stores pictures and videos on images.web.site, vids.web.site and assets.web.site
When the scanner first runs, it won’t be able to scan the site and discover images, vids or assets…, but you’ll be offered to add the web.site site to the list anyway.
On the first sync, ‘web.site’ will work, but it could be that it won’t load anything from images, vids or assets, because the VPN doesn’t know about them. (They may still work as only the main site blocks non VPN traffic.)
On the second sync, like your web browser, the scanner can read the website’s code, and sees the links to images, vids and assets, so this time, it’ll add them all and the site should work fine.

Ways around This
There’s really only two ways to deal with the issue:
- Remember when adding new sites that this could be a problem, and when adding a site use the process “Scan, Sync, Scan, Sync”
- Add the machine running the Synclias worker container to always route it’s traffic over the VPN, this is easy to do on the firewall, but if you’re sharing that machine with other uses it might not be desirable
5 - Flush States
This is a small option, with large impacts.
Recommended Settings
- On - for testing new sites
- Off - for any other regular sync
How OPNsense Reconfigures
By default, Synclias calls the “reconfigure aliases” on OPNsense.
This loads the new alias into the active ruleset and from then on new connections start to use them, no interruption to flowing traffic.
This is a perfectly good way to handle things, dropping estabilished connections can be problematic and costly in terms of time. Generally for firewall rules etc, most connections are new so it doesn’t matter.
Differences with Flush States - On
If a user has an established connection, (e.g connecting to a site from their desktop) that’ll be reused when the refresh their browser, it won’t definitely route down the new path when the user refreshes the page, which can lead to frustration and confusion
Therefore, forcing the connection to drop in this case is a better option
For auto-syncs that happen overnight, it’s very unlikely that a user will be browsing and need the “right now” application that Flush States brings.
However, for testing, it’s much more important.
6 - Backup and Restore
Backup
Everything of value is stored in the MariaDB database
Modify/run this on the host server to trigger a backup, which will dump the databases in a .sql.gz to the BACKUP_FILE location
#!/bin/bash

MARIADB_CONTAINER='mariadb'
BACKUP_FILE='/tmp/synclias.sql.gz'

docker exec ${MARIADB_CONTAINER} mariadb-dump --user ${MARIADB_USER} --password=${MARIADB_PASSWORD} ${MARIADB_DATABASE} | gzip > ${BACKUP_FILE}
Restore
Very similar as above:
- Stop the web/worker/beat containers
- Modify the following as appropriate
MARIADB_CONTAINER='mariadb'
BACKUP_FILE='/tmp/synclias.sql.gz'

docker exec ${MARIADB_CONTAINER} mariadb --user ${MARIADB_USER} --password=${MARIADB_PASSWORD} ${MARIADB_DATABASE} < zcat ${BACKUP_FILE}
- Start web/worker/beat containers
Selective Restores
In general, this isn’t recommended, but if you’ve lost your Encryption Key, you can restore most data apart from the “Routers” and “Nameservers” tables, where data is stored encrypted
- Make a copy of the .sql.gz file
- gunzip the sql.gz file
- Edit the .sql file and remove the sections for the Nameservers and Routers table
- Stop the web/worker/beat containers
- Run the restore command with the edited sql file (but change zcat to cat)
- Start the web/worker/app containers, with a new encryption key etc
- Log back in, default tables will be auto-generated and you’ll need to supply router/nameservers again
Notes on other data:
Other data is pretty transient and not really worth backing up:
Redis - this is task schedules and temporary task history (Anything needed from the result of a task is store in MariaDB, e.g. Sync History)
ASN DB A “launch” copy is held in /locker in the container, and deployed to /shared when needed.
If you need to restore a newer version, you can use pyasn to download it (most package maintainers include the pyasn_util* scripts, and you can upload “asn_db” and “asn_names” with a “docker cp” command.
7 - App Pages
7.1 - Safety Keywords
Safety Keywords act as a safeguard against accidentally adding sites during a scan.
Modern sites contain links to multiple other sites that shouldn’t run over a VPN - Youtube, Wikipedia, Google etc. Obviously it’s undesirable for random sites to start having issues because they got picked up by accident.
Guide
- Safety Keywords are vital to you not routing random important sites
- You can add any text you want in the field
- Use Exact Match to allow you to specify sites that might get matched too widely
- e.g. “x. com” and “netflix. com” would both be covered by “x. com” without Exact Match
7.2 - Sites, Scanning and Options
Scanning Options
The has two modes, in general, a Safe Scan will get the domains needed, run that first, then try turning off the safety.
-
Safe Scan
- This option pulls the site page you supplied and makes a list of:
- Direct links (“href” links)
- Image links (“img” links)
- The site domain name of any link supplied
- This option pulls the site page you supplied and makes a list of:
-
Non-Safe Scan
- This option works slight differently, in steps:
- Collect the site content
- Look through the text for anything that looks like “http(s)://<something/”
- Check that’s a domain, then add it to the list
- This option works slight differently, in steps:
This is more likely to catch domains called by JavaScript that contain extra calls.
Tech Example
The site “iplocation.net” when connecting via IPv6 will report your IPv6 VPN address, and then make a Javascript call to “ipv4.iplocation.net”. This link is buried in JavaScript and isn’t detected by a Safe Scan
Options during Sync
On the sites page, each site has two options:
-
Scan on Sync
- This runs a Safe Scan whenever you Sync, to find any urls in there and add them to the list.
- Guidance - use this at first, but experiment with turning it off:
- Off - Sync will be faster
- On - More likely to catch any new domains
-
Override Keywords
- Keywords win whenever they exist, and the domain will be removed from the Sync list
- With this option, you can choose to force the domain back into the Sync list.
-
Also Use Historical DNS
- Will track IP addresses for a specific FQDN
- When a site’s IP addresses are queried, any historical IPs for the FQDN will be added to the firewall alias as well
- Note: This does not affect DNS resolution for the site, it just means if a site returns to an old IP, it’s already lined up
7.3 - History
History provides two subpages that provide information useful in adjusting site syncs.
Sync History
This page contains details on:
- Job start/stop
- Additional FQDNs discovered during site scanning and their parent site
- Sites that didn’t scan, and any technical details for this
- Sites removed by Keywords
- IP addresses added/removed
How to use this data:
- For FQDNs that don’t resolve consistently, it’s probably worth removing them from the Sites page, or if learned by discovery, add a Safety Keyword to remove them.
- For sites that don’t scan repeatedly, individual results vary, but you may consider:
- Disabling scanning for that site
- Non-scanning sites just add to scanning times
- Removing the FQDN from the sites page
- Adjusting the User Agent string in Settings
- Ensure the Double Sync problem isn’t affecting results
- Disabling scanning for that site
IP History
This displays the entire contents of the IP history table, sorted by FQDN, this can be useful for checking if a site is moving, and how often.
7.4 - Resetting the Admin Password
Synclias only contains one user, so resetting the admin password is fairly simple
- Stop the stack
- Edit your .env file:
- Uncomment the “CLEAR_ADMIN=” line
- Set the value to true
- Start the stack
- Stop the stack
- Revert the changes to .env
- Start the stack
Next time you access the system you will be taken to the “set password” prompt
7.5 - ASNs
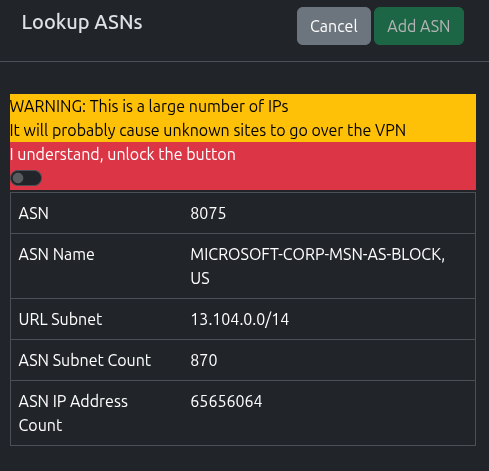
ASNs are an incredibly powerful tool, but there can be unseen problems caused by using a VPN to route them.
Consider them a last resort, and never add huge ASNs like those for Google/Amazon etc. You’ll end up routing anything on AWS etc over the VPN
Generally, if you’re unsure, never add an ASN, it won’t fix that one site that just won’t work
Every subnet on the internet is managed by an organisation. They’re grouped into Autonomous System Numbers (ASNs)
Occasionally, it can be useful to route an entire ASN over the VPN
Looking up ASNs
The ASN page contains a lookup tool that can tell what ASN a site belongs to.
Simply enter the domain into the lookup form and click Lookup
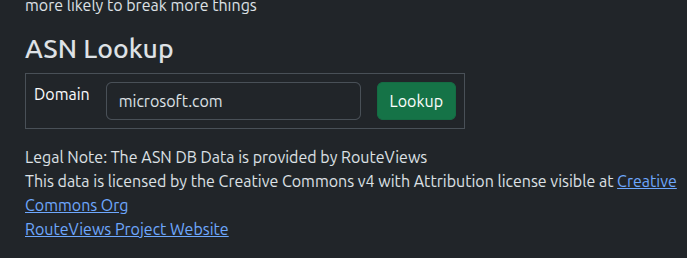
Once the lookup is complete, you’ll be presented with the results, including a count of subnets and IP count.
7.6 - ASN Database
{% alert %} Automatic download functionality is currently disabled to allow the beta to ship, it will be re-enabled when I can be certain it’ll work. {% /alert %}
Recommended Settings: If you’re not using ASNs, you don’t need to worry about the ASN database, nd don’t worry about making sure you’ve got the latest version all the time.
The ASN database is downloaded from the Route Views project.
This project does amazing work in assembling this data, however there are sometimes problems downloading it (stalled/slow connections), which can stall out the worker container.
Updating the Database
If you would like to upgrade the database to a newer version, it can be performed as follows.
You will need the “pyasn” package from pip installed. this will provide three utility scripts.
Or, if you’re on a Linux system, it’s normally bundled with “python3-pyasn” package for your distro, and can just run these commands from the cli after installing it.
## Download the full rib file
pyasn_util_download.py --latestv4 --filename latest.rib

## Convert that file to a usable format
pyasn_util_convert.py --single latest.rib asn_db

## Download the ASN Names file
pyasn_util_asnames.py -o asn_names

## This will give you two files - asn_db and asn_names

## Get the name of your web docker container
docker ps
## Look for the container name similar to "synclias-web-1"

## Copy the files into the web container
docker cp asn_db synclias-web-1:/app/shared/
docker cp asn_names synclias-web-1:/app/shared/
That’s it! The server will automatically pick up the files when needed.