Regularly scan websites for a list of domains/links
Safely collect a list of those domains
Adjust a Firewall Alias to route those sites over a VPN automatically
Sadly, it can’t work for every site, and once in a while it’ll miss a site due to how the internet works, but it’s an extra option rather than turning a VPN on/off all the time.
Sounds Interesting?
1 - Tell me more
What is it?
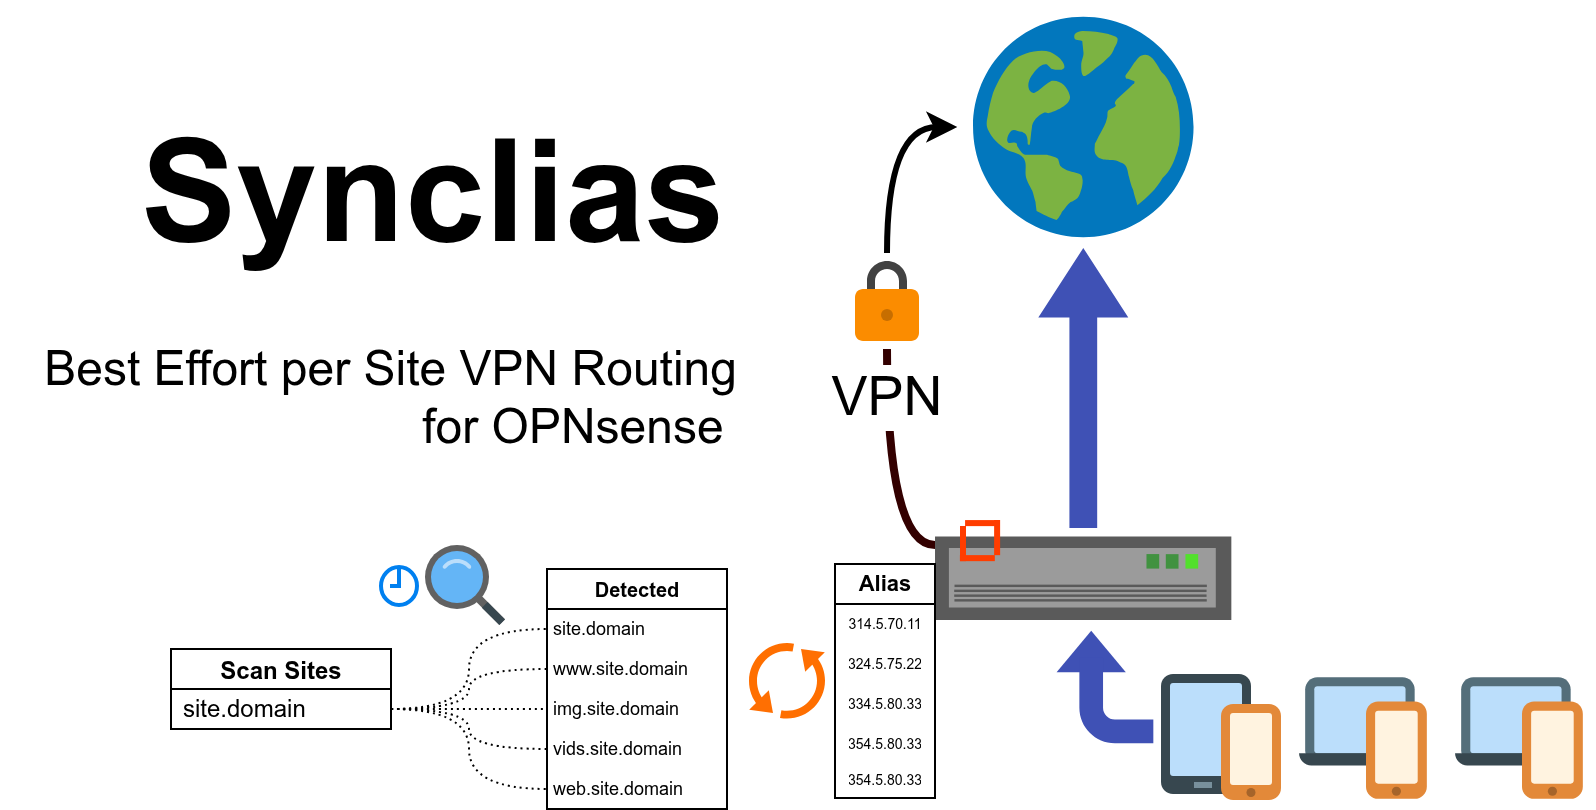
Synclias is a best effort tool to route specific websites over a VPN for OPNsense routers.
With modern changes going on on the internet, it’s common to need a VPN for some things, but it’s not ideal to route everything over it. Turning it on and off can be a pain, using separate browsers for different things isn’t ideal, there’s a speed impact of a VPN and setting up clients on all devices can be a lot of overhead.
It would be much easier if your router could automatically take care of it for you and just send some sites over the VPN and leave the rest of the traffic alone.
Here’s a demo of it in action
It’s a bit long and dry, but I don’t want to edit/shorten bits of the process.
Delays in site loading only happen after just adding a site, after 15 seconds, they’ll always load as fast as on a VPN.
Let’s take a trip to Romania and back, for one site only.
How does it work?
We’ll guide you through configuring a VPN on OPNsense and make an Alias - a group of servers/IPs that you want to send over the VPN.
Synclias lets you:
Scan a website for links it needs
Add those links to a Sync list
Then, on an automatic schedule, or manually:
Rescan the sites (if needed)
Work out all the servers
Remove any sites that match rules you set up (eg Youtube)
Work out all the IP addresses and update the Alias
For the techy people already saying “That doesn’t work” - I get it, there’s certainly some challenges here and I’m not disagreeing with you, I know enough about DNS and routing to know that, I’ve got a page for you explaining my choices - Right Here
There’s a full flowchart of everything a sync does Here
For the rest:
What does “best effort” mean?
At any time, www.<website>.com will point to an IP address (or multiple)
Websites move about, they change IP address every so often, some quickly, some very, very slowly.
Synclias will scan a website, work out it’s IPs (and IPs for related parts of the site) and automatically update your router to send them over the VPN.
It repeats on a schedule you set, re-scanning and updating the list for you in the background.
The problem the techy people spotted is that there’s a few scenarios where a site moves and we’re not up to date. If that happens, you’ll fall back to a connection in your country. At which point, you can force a Sync, or turn on a VPN client.
This all sounds a bit too good to be true
There’s a reason this could never be a business and isn’t part of some routers - “Best Effort”, it works most (like 99% for most sites) of the time for most sites, but there will be misses.
Every site is different, some will “miss” for one reason or another once a month, others will work fine for a year, then have a day when they miss, followed by another year of working fine.
When a site does change IP address, you might end up at your country’s version of the site until the next sync, or you can just turn on a VPN client like you already do. Synclias gives you another, automatic option that should mean you don’t normally have to do anything.
Do I need to change any settings on my PC/Phone?
No, I hate having to remember to apply some tweak/setting to a device, any client device won’t need any configuration, just the router. And there’s an extra, optional feature for some DNS servers.
There’s rules and specifications for how IP addresses change, nothing Synclias does it outside of those specs.
What happens when it doesn’t work?
You’ll end up on the version of the site for your country. If it did work before and doesn’t now, you can either wait for the next sync to happen, or trigger it yourself, but generally these times are rare. Again, it depends on the site.
So how useful is it?
It started as a python script on a Raspberry Pi and actually worked so well I wanted to make it usable for people I know, so here we are. I genuinely wasn’t expecting that, and I needed to make it easy enough to use so that people don’t have to tell me their browsing habits if they need support.
It won’t work for all sites, don’t use it to route Google or your bank etc, (but the point of Synclias is that you don’t have to) I use it to sync the route for an image hosting website to the UK so forums I use work. It also works for most of those sites…
And because the work’s done by the router, every device on your network works, if you want it to.
Everyone has different use cases, for some people it’ll work perfectly, for others they’ll want sites that just won’t work
Of the three devices I use daily - laptop, computer and phone, I’ve never had to use a VPN on my computer or phone, it’s always got there first.
Does this replace my VPN client?
No, since we’re aiming at Best Effort here, most sites will work fine with it, but you’ll probably still find there’s some things that still need a VPN, the goal is to reduce those times dramatically. It’s about giving you an extra option. Your VPN client will still function perfectly, just as it did before.
How hard is it to configure a Site?
It depends on the site, most of them are a case of putting them in the Scanner, clicking go, and adding the sites to the Sync list.
Some need a lot more work, and digging through some tools already in your web browser, again there’s guides for that, or I’m sure if people use it, there’ll be some public lists available, or, I like a challenge, let me know the site.
There may also be a developer button to import some presets in the interface so I can prove it can do what I say.
What’s it not for?
Most of the stuff you don’t use a VPN for now, the big sites - Google, Youtube, Reddit etc.
Reddit blocks VPNs, Google/Youtube will work, but they’ll know you’re on a VPN and may turn on some extra stuff for logins etc. I doubt Netflix will work.
And obviously, because there’s a chance that some traffic won’t get routed, bear that in mind if you don’t want to risk being in a log file. There isn’t a guarantee, but it generally just works.
What happens if it all breaks?
The only thing we apply changes to is a “Firewall Alias”, a group of IPs on your router. Any problems, just disable the firewall rule for it, or delete everything in the alias, and it’ll be like nothing happened.
There’s guides to walk you through setting that up, so you’ll know exactly where to go, and a page for Emergency Backout Synclias Changes
Have a look, it’s a really short piece of work, with few steps, and no thinking or needing to work things out.
What about security?
This is a really important question when it comes to anything talking to the router. The permissions required are very specific and detailed in the setup guide, along with more detais in the technical section. In short, only permissions for viewing/editing an alias is required and the permission to apply the config.
That part of setup is all manual, and short, mainly because I want people to see what permissions are granted rather than me just supplying some commands to run on the router.
And the code for everything, and every call it makes to the router, can be seen in the Github repo.
A guide to creating a user and API keys with the minimal needed permissions can be found Here
4. Where to run Synclias
Synclias can run anywhere you can run x86 containers.
However, you may consider deploying it on a server where you can forward all of it’s external traffic through a VPN, e.g. a VM/LXC. This will make scanning easier, avoiding problems where it can’t scan until after a Sync, but it’s not required.
Docker/Docker Compose
Before you get started, you’ll need a machine running Docker.
The best place for guidance on this that I’ve seen is:
This is included in Docker Desktop for Windows/Mac.
For Linux - normally “docker-compose-plugin” from your package manager
If you want to use another container orchestrator, it should work fine.
5. Optional - Technitium API Token
Synclias provides optional support to clear cache entries from a Technitium server. It is not required for Synclias to function
This feature ensures the cache is refreshed with the largest possible expiration time for each site on each scan, and can provide benefits for some sites, but not all.
If you wish to use the cache clearing feature of Technitium, a guide for setup with minimal required permissions can be found here.
5. Understaning the Impact of Flush States
Flush States (an option in settings) is a very powerful tool for testing sites.
It’s off by default, and generally should stay that way
Normally, when Synclias syncs, it adjusts the ruleset, and that ruleset applies to new connections.
If you’ve just been to a site and realised you need a VPN, you most likely have an “established connection” to that site.
Flush States signals the router to drop any established connections
This greatly increases the chance that when you revisit the page it works fine
However, running this more than a couple of times in 10 minutes can cause visibile hiccups to internet connectivity.
6. Make sure you know the Emergency Exit
Synclias has been running fine for months in some environments.
However, it’s always good to know how to reverse anything when making a change.
Log into OPNsense
Find the Alias(es) in Firewall -> Alias
Edit the alias
Remove and listed IPs/Networks from the Alias
Save
Repeat for an IPv6 Alias, if you’re using one
Apply Changes
That’s it, completely backed out (and make sure you disable auto-sync if on)
7. An Understanding of Limitations
Before proceeding, it’s important to understand the limitations of Synclias.:
Nothing it does should break any sites at all, but I’m not able to guarantee it, some site may do something truly bizarre with their code.
You may end up at the site for your country once in a while - if a site moves IP before the next Sync
This completely depends on the site, but in testing for over 50 sites, it was around once a month on average across all sites.
Safety Keywords (dealt with in the setup guide) will save you a lot of issues with sites such as Youtube etc getting dragged into the VPN by accident
Scans happen before sites are put into the VPN alias - this means the scanner cannot work on the first sync for some sites.
Any VPN client will still function as a backup just fine
Finally, when first setting up a site:
Browsers and cache can cause real headaches.
You will often see advice to close/re-open another browser during setup. It’s strongly suggested to follow this guidance.
Generally, the only issue that’s occured during testing for deploy this far is that the web/worker/beat containers won’t start up, complaining about MySQL denies
This is normal during database startup, especially the first time
There are healthchecks to prevent this, but some still slip through
Give it a couple of minutes to retry
If, after a few minutes, you’re still having problems:
Stop the stack:
docker compose down
Find the database server name
docker ps -a
Delete the database server
docker rm <database name - probably synclias-db-1>
Find the database volume
docker volume ls
Be careful, and delete the volume:
docker volume rm <<database volume name>>
Edit the .env file and set a simpler (not shorter, and not too simple) password
Try without - signs or spaces
Bring the stack back up
2.3 - 3. Configure app settings
Router and DNS settings
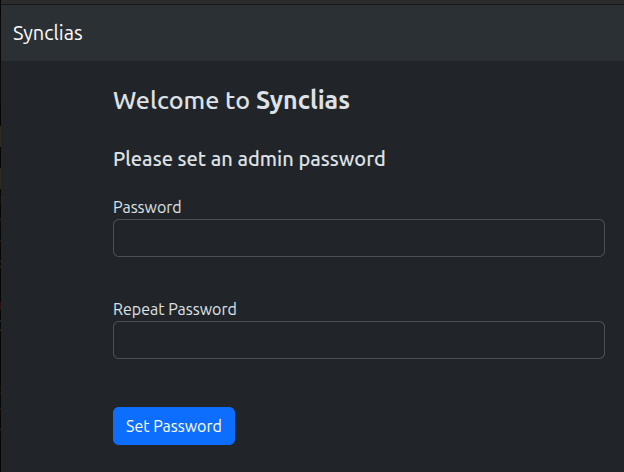
1. Set an Admin Password and Log in
When you first open Synclias, you’ll be asked to set an admin password.
Once that’s done, go ahead and log in.
2. Configure Router Settings
You’ll be taken to the Settings page, with various sections for configuration.
Start with the Router settings section
If you need API Key/Secret - there’s a guide - Here
If you need Alias/IPv6 Aliases - there’s a guide - Here
Setting
Hostname
fqdn for your router - e.g. router.localdomain
API Key
API Key for the Synclias user on OPNsense
API Secret
API Key for the Synclias user on OPNsense
Alias
Name of the OPNsense IPv4 Firewall Alias to use for routing sites (typically “VPN_Websites”)
IPv6
Whether or not to do the work for an IPv6 Alias
IPv6 Alias
Same as “Alias” but for IPv6, (typically “VPN_Websites_IPv6”)
Use HTTPS
Whether to connect using HTTP or HTTPS
Verify TLS
Whether a valid certificate is required for an HTTPS connection
Plug in all the values you need and click Save
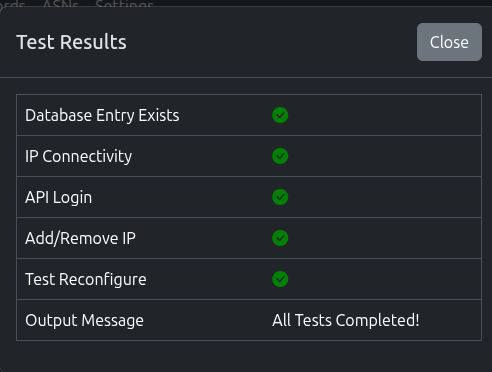
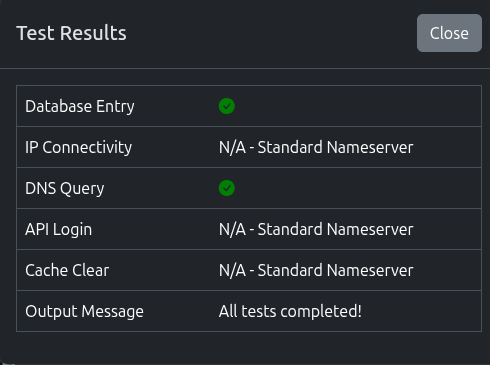
Next, click Test and Synclias will run a suite of tests
The test should report any issues with the setup
Please ensure you click Save before Test
3. Configure Nameservers
Synclias needs to know what internal DNS you have.
During a scan, it will query all of them to:
Get the largest set of IPs possible
Ensure they’ve got cache entries for sites, which may reduce VPN misses
Do NOT add any external servers here
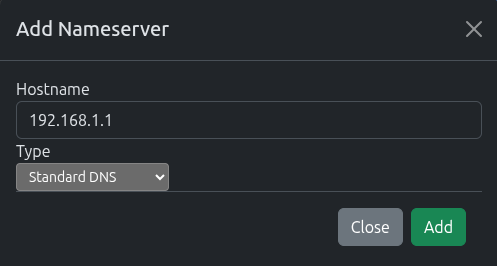
To add a standard DNS server:
Click the Add Nameserver Button
Enter the hostname/IP of the DNS Server
Select Standard DNS
Once added, click Test for the nameserver to make sure we can query it.
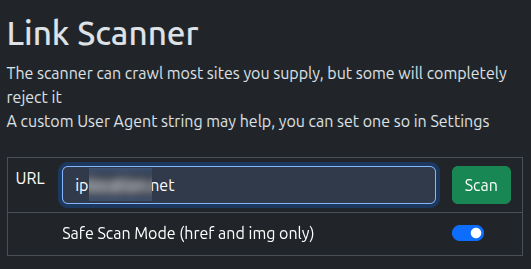
Simple as can be, just type or paste in a website, and hit Scan
If there’s something on a specific page that’s not working, try the whole page address.
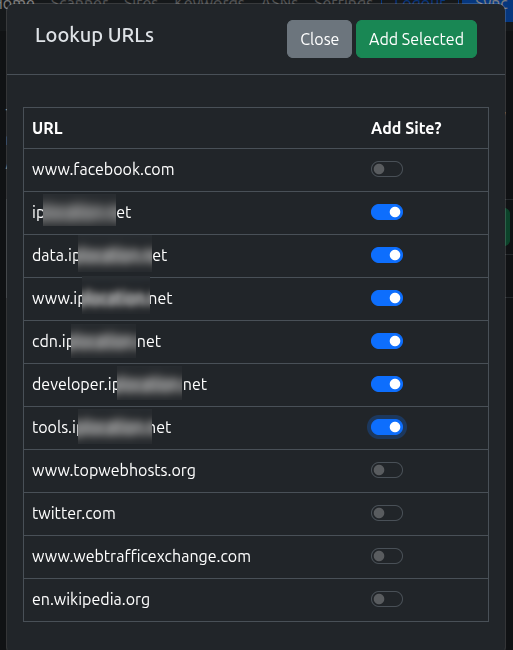
The scanner will go off and hopefully pull back the page, and you’ll see a list of links like this:
Pick the links you want to add to the VPN and click Add Selected
If you’re not sure what to pick, see Guidance on Domains to addTry not to add everything!
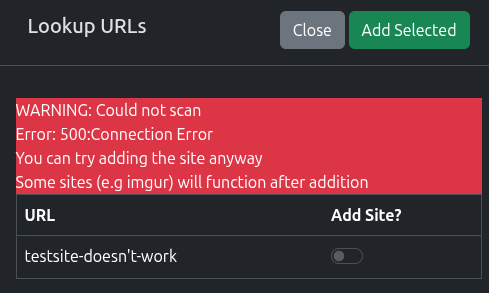
Sadly, some sites, won’t scan and you’ll see something like this, where you can still add the base domain of the site to the list. Do that, run a sync and try the scanner again. If not, have a look at the pages linked at the bottom of this page.
Remember - the scanner doesn’t go over the VPN (yet), so you might be able to scan after the first Sync.
2. Review the Sites Added
You’ll be taken to the Sites page, where you new sites should be there.
Here, you can turn off Scanning the site when the Sync runs.
For now, leave it on, but ideally, you want to turn it off for overlaps/most sites
3. Add some Safety Keywords
When it can crawl sites, the scanner works great, but it can get a bit over-ambitious, so we’ll need to reign it in a bit.
Most sites will have links to social media and other sites, places you don’t want to send over the VPN.
This is where Safety Keywords come in. They’re incredibly important in making sure you don’t start routing other sites
Any links the scanner discovers during a sync will be checked against any of the listed keywords, if that word’s in the address, it’ll drop it from the results.
Visit the Keywords tab and you’ll see a blank list for now.
Go ahead and add anything you think would be useful and/or click Import Suggestions
4. Turn on Flush States
Flush States forces the firewall to forget any established connection.
This works perfectly for testing as it removes a large unknown variable of whether a site is working. Most connections will automatically re-establish, however, it’s generally not desirable to have this happen regularly
If you wish to avoid having connections drop, please wait for connections to time out before testing a site. This can take a few minutes at least.
Visit the Settings page
Toggle Flush States on Sync to On
Once the site is working, Flush States should be turned off again.
5. Run a Sync
That’s it! Click the Sync button and it’ll run off and apply the changes
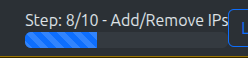
You can monitor the progress in the top bar:
5. Check it Worked
That’s it!
If it’s your first sync, you may want to run it again to avoid the [Double Sync Problem]
Otherwise, open a new browser (don’t use the same one, for your first site, we want to make sure there’s no old connections hanging around) and test the site.
Whilst it’s been written a lot, it cannot be stressed enough how important opening a new browser here is.
This is your first site, let’s get a win, rather than mistaking an error.
“Established” connections can stick and you won’t see any changes.
If it didn’t work:
Check if there’s new IPs in the Alias on OPNsense (System -> Firewall -> Alias)
Have a look at the [Definitive Site Fixing Guide]
Check the [Logging] for the “worker” container
If you used the same IP locating site as the demo and see your IPv6 change but not your IPv4:
Go add “ipv4.ip……..* to the site list
Have a read about “Safe Scanning” on the sites page
1. Do not keep "Flush States" on for auto-syncs
2. Using a shorter sync time may seem like a good idea, but it really isn't.
Changes to firewalls can cause problems with connections clearing etc.
This is made even more important when Flush States is enabled in App Settings as connections are dropped.
Please turn this off for regular use
You do not want all your firewall states to drop every X hours.
More details of the impact of Flush States can be found Here
You may also consider not turning on auto-sync and seeing how long it takes to start missing on its own, you may be surprised.
With site(s) added, you can set up a Sync schedule
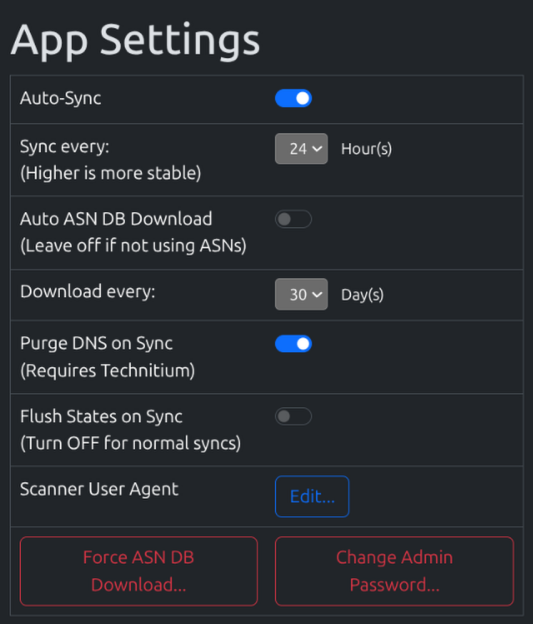
Head back to the Settings page and find the App Settings section
Change Flush States on Sync to OFF
Change Auto-sync to On
You can adjust the sync schedule, at the start leave it at 24 Hours
As long as “Flush States” is Off, feel free to drop this as low as you like.
These settings apply automatically when set, and every 24 hours will schedule a sync for 0000 daily.
2.6 - OPNsense User Access Setup
Overview
Synclias requires API access to OPNsense, with permissions to view and edit Firewall Aliases and trigger a “reconfigure” to apply the changes
It assumes the VPN and Firewall Alias are already created as per that guide
This guide will:
Create a group synclias_group with necessary pemissions granted to it
Create a user account synclias as a member of the group
Generate an API key/secret to allow Synclias to log in
This guide assumes access to the web interface with admin permissions
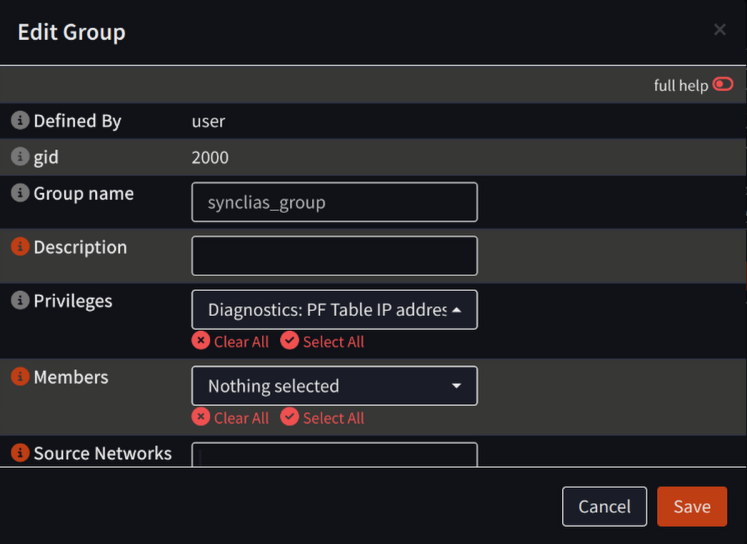
Create a Group
Navigate to System -> Access -> Groups
Click +
Configure the new group with all settings at default, except:
Group Name: synclias_group
Privileges:
Diagnostics: PF Table IP addresses
Diagnostics: Show States
Firewall: Alias: Edit
Firewall: Alias
Click Save.
Sadly, not all of the privileges fit in a screenshot, ensure you’ve got all four.
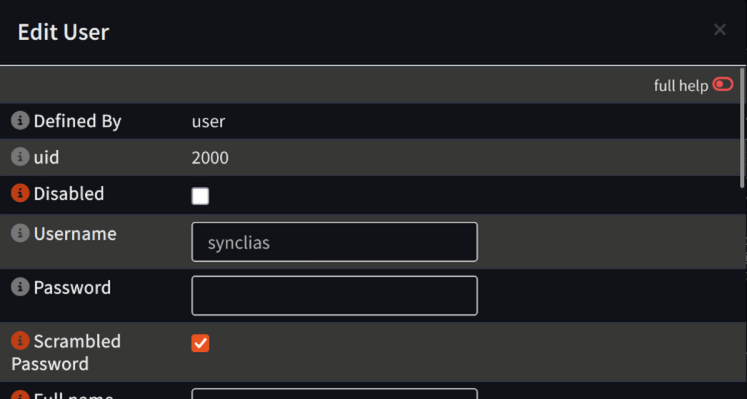
Create a User Account
Navigate to System -> Access -> Users
Click +
Configure the new group with all settings at default, except:
Username: synclias
Scrambled Password: Checked
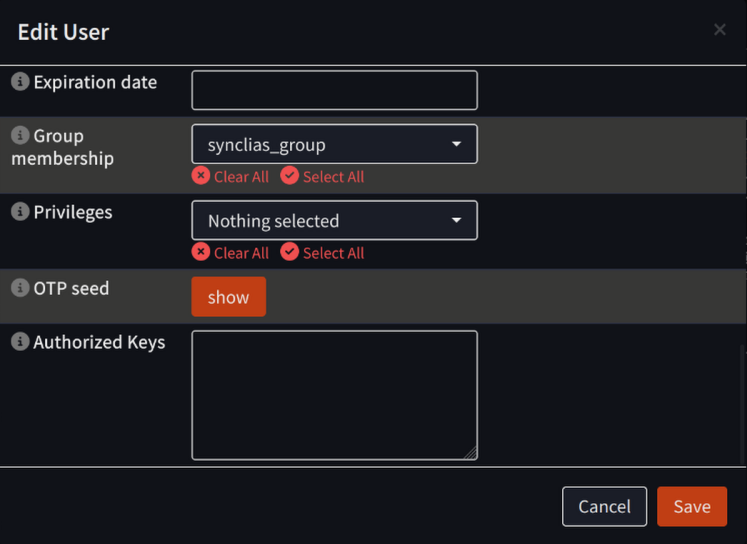
Group membership: synclias_group
Top of Dialog:
Bottom of Dialog:
Click Save
Generate API Key
Navigate to System -> Access -> Users
Locate the opn_alias user and in the Commands section click the button to Create and Download an API Key for this user (The icon looks like a rectangular ticket, and is to the left of the edit button)
On the popup confirmation window, click Yes
A text file will be downloaded containing “key=…” and “secret=…” lines, ensure to keep this safe
2.7 - Optional - Technitium User Account
Overview
Synclias can manage DNS cache on some DNS servers. At this time, only Technitium is supported as it’s a common DNS server that provides individual record clearing. Others, such as pi-hole need the entire cache cleared.
By having this access, whenever the sync runs the DNS records for individual records will be purged from the DNS cache and refreshed, rather than just queried.
For many sites this won’t make any difference, however for some sites it reduces the chance that clients will trigger an external lookup and get a different IP address for a site that the VPN is configured for
To allow this, Synclias needs very minimal access to Technitium, with permissions only to eject a site from the cache
This guide will:
Create a User named “cache_clear”
Create a Group called “cache_clear_group”
Add the user to the group
Grant necessary permissions to the group
Create a user token for Synclias to use
All steps below assume access to the management web interface
User Setup
Navigate to: Administration -> Users
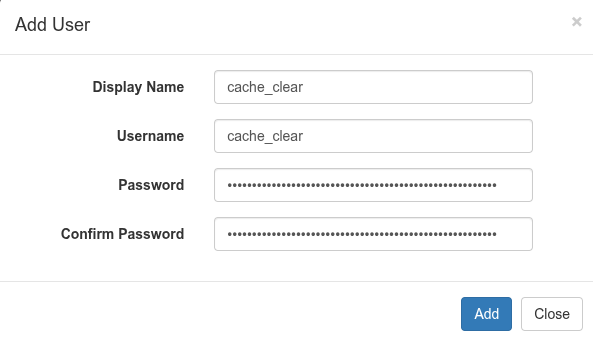
Click Add User and create:
Display Name: cache_clear
Username: cache_clear
Password: <Supply a very long password, this will never be needed>
Click Add
Group Setup
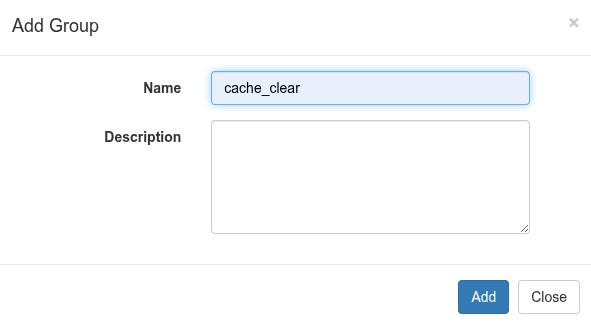
Navigate to: Administration -> Groups
Click Add Group and create:
Name: cache_clear_group
Description: “Group for Synclias cache management users”
Click Add
Add User to Group
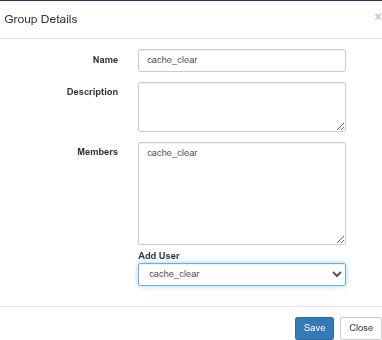
Navigate to: Administration -> Groups
Click the cache_clear_group
Use the Add User dropdown to add cache_clear to the group
Click Save
Grant Required Permissions
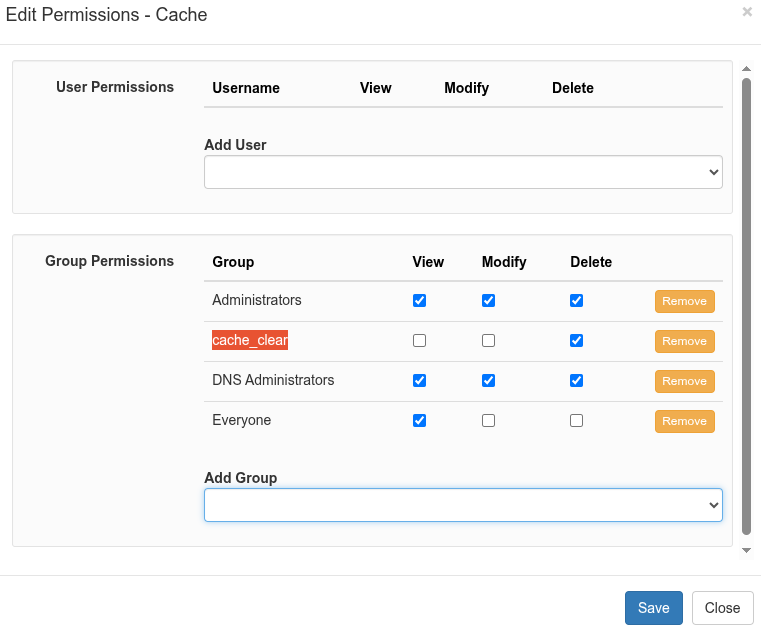
Navigate to: Administration -> Permissions
In the Section column, click Cache
From the Add Group dropdown, select the cache_clear_group to add it to the Group Permissions section
Ensure permissions for the cache_clear_group are set as follows:
View: Empty
Modify: Empty
Delete: Checked
5. Click Save
Create a Token for the Account
Navigate to: Administration -> Sessions
Click Create Token and create:
Username: select cache_clear from the dropdown
Token Name: “Synclias Cache Clear”
Click Create
Note down the Token String.
Once this window is closed there is no way to get the token displayed again
Click Close
Note
If the token is lost at any time or needs to be replaced, delete the token from the Sessions page and create another
3 - User Guide
3.1 - Which Domains to Add
Sadly, this isn’t an exact science, but making a start is easy, then dial it in.
Or ask about if there’s any other users for a site you want
The Golden Rules for finding domains are:
It’s ok to add too many domains temporarily, but apply some common sense
Don’t and any Google/Amazon size sites or things that might be used by other sites
Removed domains you don’t need afterwards.
If you go “all in”, make sure you put in the effort to prune the list afterwards, it will cost you in the long run.
Don’t forget cookies and a hard refresh/browser close/re-open when testing
Add
Anything <something>.<\website-you-want>.domain
Things like “static.hx-sedn.domain” where"hx" seems to relate to the site you want to add (abbreviation etc)
For “Manual” users - If there’s a domain that’s loading a lot of content image/videos etc
Look in the “File” column in Developer Tools - if it isn’t related to Google/AWS etc and just seems to be a random domain (like “tt-rr.domain”, add that as well)
Avoid
Anything Google/Microsoft/Apple/Cloudfront/Cloudflare etc (hint: gstatic is one of Google’s)
Anything that doesn’t really relate to the domain, this is really a judgement call
Common (Internet wide) Libraries:
These can be hard to spot at first, but you’ll spot the common ones quick)
These appear on loads of sites, these won’t block your site, but you don’t want to add them to the VPN for speed reasons:
“jsdeliver / jquery and similar sites unless it’s jsdeliver.<the-domain-you-want>
“getbootstrap”
3.2 - Definitive Guide to Sites
There’s a lot of things that can happen when trying to add a site.
This page can look scary, there’s a lot of options, you don’t need them all
Remember - once you lock a site in, it’s pretty solid.
And if you do get stuck, other users may already have a list they can give you
This guide tries to cover most scenarios, some steps won’t be necessary, but they’re there for completeness.
Be aware that clearing your cookies and restarting/trying another browser can really help
In testing a few users insists that a new site won’t hit the VPN for15 minutes after a Sync. They’ll report that they closed their browser, but couldn’t reproduce on a video call when the browser was closed.)
Flush States
In Settings, the Flush States option will flush any active connection on Sync
For troubleshooting, this can clear up issues prevent them being hidden
Add the site as is to the list, Sync and try again
Do a second sync, then try a forced refresh in your browser (Ctrl + F5/ Shift + F5/Command + F5 depending on your browser)
If you were getting “flat out block” page in your web browser (e,g the page just says “403 Unauthorized” or plain “Not in your country” message) and you’ve run two Syncs -
Ensure Flush States is on, and run another Sync
Close your browser and open it again/try a different browser just for testing - sometimes “Established” TCP/IP will stick for a few minutes.
You can check the IP of the site your browser is using from Developer Tools in the Browser and compare to the alias, but it’s easier just to proceed to the next step:
If you’re still getting:
Scan results back but it’s not fixing it, head down to Unsafe Scan
An error (e.g. 403 etc) have a look at: Manually Looking for Site Domains
Unsafe Scan
Sometimes sites will use scripts to call extra domains, these won’t show in a normal scan, but probably will in an Unsafe Scan.
This type of scan will find every “http:// or https://” links in the page, you may, or may not, see extra domains in there.
Revisit the Scanner page
Uncheck the “Safe Scan” box
Run the scan again - you should get a bigger list of domains
For guidance on which domains to add, refer to the Guidance on which domains to add page here
If that doesn’t do it after a Sync/Cookie Clear/Hard Refresh, have a look below at manually finding the domains.
Manually Looking for Site Domains
This is the most reliable way to do it if the scanner doesn’t work. It’s a bit of poking about but it’s easier than it looks.
The easiest way to find list of domains is from the web browser
Open the site (even if it doesn’t work)
Press F12 to open the Developer Tools in your browser
Find the “Network” Tab
Reload the page so that the Network tab shows all the connections
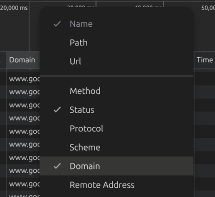
If you don’t have a “Domain” column in there, right click the columns at the top and add it in
Sort the Domain list alphabetically
Have a look through the list, you’ll see there’s lots of common site in there
If you’ve got an adblocker, you can ignore any lines that show up in red. That’s it doing it’s job
Select the domains you need - have a look at the Guidance on which Domains to Add section below, and then come back here once you’ve made your choices.
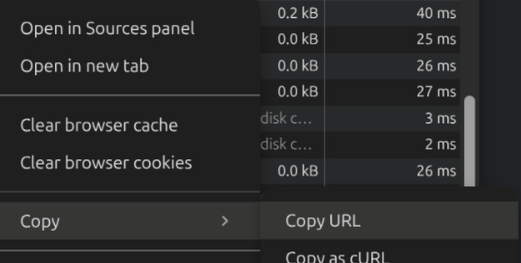
To copy the domain so you can paste it in, right click a domain and select “Copy -> Copy URL” then paste the full link Site -> Add Site function in Synclias to add it, it’ll work out the domain from the full link.
Once you’ve done that, run another Sync
Before you try to access the site again, it’s best to delete any cookies from the site, some mark your browser with a cookie that sticks, even if you’re going over the VPN.
Make sure the Sync is complete
In your Developer Tools in the browser:
Depending on your browser:
Firefox - Storage Tab
Chrome Basked - Application Tab
Look for any cookies from the site
Right click -> Delete/Clear them
Then hard refresh the browser (Ctrl +F5/Shift+F5/Command + F5 depending on your browser)
3.3 - Logging
At this time, Synclias collects historical data during a scan, and records results.
During development, it may crash, and not record a log, but these cases should be rare.
Active logs are written to the console on each Docker container and can always be monitored there in real-time
Finding the Container Names
To find the container name, use a Terminal window to run:
docker ps
You will be presented with a list of running containers. By default the last column is “Name”:
Viewing Logs
To watch the logs on a container, run the command:
docker logs -f <container-name>
The two main containers to watch for logs are:
Worker - where syncs and all back end processing happens
App - Web front end
e.g the logs for the Worker will look as follows after it starts up.
Some useful info appears in this log:
Parent-Child scan results - if you want to see how a site got discovered
Alias contents
Site scanning/DNS issues
3.4 - The Double Sync Problem
When normally installed, Synclias has the same access to sites as any machine on your network, which means that if a site is blocked completely, the scanner doesn’t function.
This causes what has been termed the “Double Sync” problem, where two Syncs are required to get a site to work completely. It’s more of an inconvenience but if a site isn’t working after a Sync, it’s worth bearing in mind.
Sites this Affects
They’re fairly rare, mainly it’s any site that doesn’t return anything back at all apart from the text “Not available in your country”
If a site shows a website but then warns about your location, or something else blocking it, you should get some decent results on the first time through.
Example of the Double Sync Issue
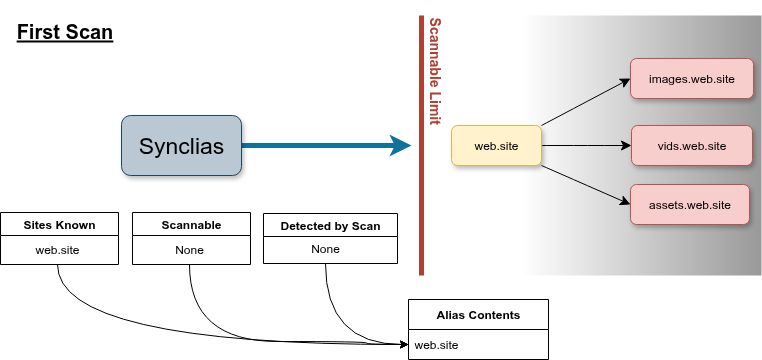
As an example, lets say:
There’s a site you want to access: web.site but it’s completely blocked by IP.
This site stores pictures and videos on images.web.site, vids.web.site and assets.web.site
When the scanner first runs, it won’t be able to scan the site and discover images, vids or assets…, but you’ll be offered to add the web.site site to the list anyway.
On the first sync, ‘web.site’ will work, but it could be that it won’t load anything from images, vids or assets, because the VPN doesn’t know about them. (They may still work as only the main site blocks non VPN traffic.)
On the second sync, like your web browser, the scanner can read the website’s code, and sees the links to images, vids and assets, so this time, it’ll add them all and the site should work fine.
Ways around This
There’s really only two ways to deal with the issue:
Remember when adding new sites that this could be a problem, and when adding a site use the process “Scan, Sync, Scan, Sync”
Add the machine running the Synclias worker container to always route it’s traffic over the VPN, this is easy to do on the firewall, but if you’re sharing that machine with other uses it might not be desirable
3.5 - Flush States
This is a small option, with large impacts.
Recommended Settings
On - for testing new sites
Off - for any other regular sync
How OPNsense Reconfigures
By default, Synclias calls the “reconfigure aliases” on OPNsense.
This loads the new alias into the active ruleset and from then on new connections start to use them, no interruption to flowing traffic.
This is a perfectly good way to handle things, dropping estabilished connections can be problematic and costly in terms of time. Generally for firewall rules etc, most connections are new so it doesn’t matter.
Differences with Flush States - On
If a user has an established connection, (e.g connecting to a site from their desktop) that’ll be reused when the refresh their browser, it won’t definitely route down the new path when the user refreshes the page, which can lead to frustration and confusion
Therefore, forcing the connection to drop in this case is a better option
For auto-syncs that happen overnight, it’s very unlikely that a user will be browsing and need the “right now” application that Flush States brings.
However, for testing, it’s much more important.
3.6 - Backup and Restore
Backup
Everything of value is stored in the MariaDB database
Modify/run this on the host server to trigger a backup, which will dump the databases in a .sql.gz to the BACKUP_FILE location
In general, this isn’t recommended, but if you’ve lost your Encryption Key, you can restore most data apart from the “Routers” and “Nameservers” tables, where data is stored encrypted
Make a copy of the .sql.gz file
gunzip the sql.gz file
Edit the .sql file and remove the sections for the Nameservers and Routers table
Stop the web/worker/beat containers
Run the restore command with the edited sql file (but change zcat to cat)
Start the web/worker/app containers, with a new encryption key etc
Log back in, default tables will be auto-generated and you’ll need to supply router/nameservers again
Notes on other data:
Other data is pretty transient and not really worth backing up:
Redis - this is task schedules and temporary task history (Anything needed from the result of a task is store in MariaDB, e.g. Sync History)
ASN DB
A “launch” copy is held in /locker in the container, and deployed to /shared when needed.
If you need to restore a newer version, you can use pyasn to download it (most package maintainers include the pyasn_util* scripts, and you can upload “asn_db” and “asn_names” with a “docker cp” command.
3.7 - App Pages
3.7.1 - Safety Keywords
Controlling the auto scanner
Safety Keywords act as a safeguard against accidentally adding sites during a scan.
Modern sites contain links to multiple other sites that shouldn’t run over a VPN - Youtube, Wikipedia, Google etc. Obviously it’s undesirable for random sites to start having issues because they got picked up by accident.
Guide
Safety Keywords are vital to you not routing random important sites
You can add any text you want in the field
Use Exact Match to allow you to specify sites that might get matched too widely
e.g. “x. com” and “netflix. com” would both be covered by “x. com” without Exact Match
3.7.2 - Sites, Scanning and Options
Scanning Options
The has two modes, in general, a Safe Scan will get the domains needed, run that first, then try turning off the safety.
Safe Scan
This option pulls the site page you supplied and makes a list of:
Direct links (“href” links)
Image links (“img” links)
The site domain name of any link supplied
Non-Safe Scan
This option works slight differently, in steps:
Collect the site content
Look through the text for anything that looks like “http(s)://<something/”
Check that’s a domain, then add it to the list
This is more likely to catch domains called by JavaScript that contain extra calls.
Tech Example
The site “iplocation.net” when connecting via IPv6 will report your IPv6 VPN address, and then make a Javascript call to “ipv4.iplocation.net”. This link is buried in JavaScript and isn’t detected by a Safe Scan
Options during Sync
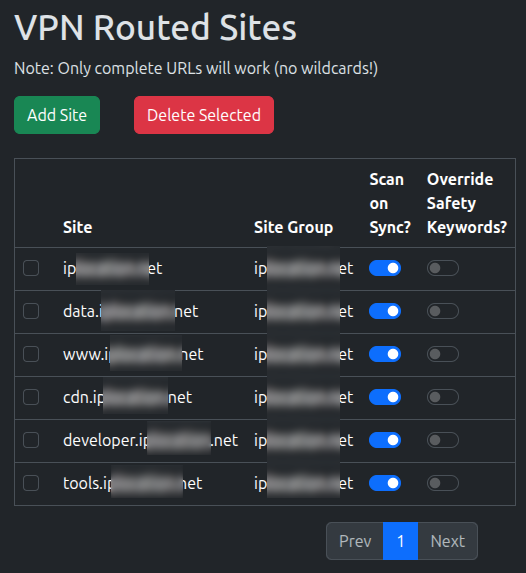
On the sites page, each site has two options:
Scan on Sync
This runs a Safe Scan whenever you Sync, to find any urls in there and add them to the list.
Guidance - use this at first, but experiment with turning it off:
Off - Sync will be faster
On - More likely to catch any new domains
Override Keywords
Keywords win whenever they exist, and the domain will be removed from the Sync list
With this option, you can choose to force the domain back into the Sync list.
Also Use Historical DNS
Will track IP addresses for a specific FQDN
When a site’s IP addresses are queried, any historical IPs for the FQDN will be added to the firewall alias as well
Note: This does not affect DNS resolution for the site, it just means if a site returns to an old IP, it’s already lined up
3.7.3 - History
Automated System Numbers
History provides two subpages that provide information useful in adjusting site syncs.
Sync History
This page contains details on:
Job start/stop
Additional FQDNs discovered during site scanning and their parent site
Sites that didn’t scan, and any technical details for this
Sites removed by Keywords
IP addresses added/removed
How to use this data:
For FQDNs that don’t resolve consistently, it’s probably worth removing them from the Sites page, or if learned by discovery, add a Safety Keyword to remove them.
For sites that don’t scan repeatedly, individual results vary, but you may consider:
Disabling scanning for that site
Non-scanning sites just add to scanning times
Removing the FQDN from the sites page
Adjusting the User Agent string in Settings
Ensure the Double Sync problem isn’t affecting results
IP History
This displays the entire contents of the IP history table, sorted by FQDN, this can be useful for checking if a site is moving, and how often.
3.7.4 - Resetting the Admin Password
Synclias only contains one user, so resetting the admin password is fairly simple
Stop the stack
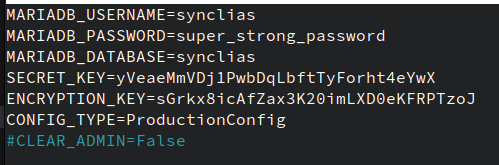
Edit your .env file:
Uncomment the “CLEAR_ADMIN=” line
Set the value to true
Start the stack
Stop the stack
Revert the changes to .env
Start the stack
Next time you access the system you will be taken to the “set password” prompt
3.7.5 - ASNs
Automated System Numbers
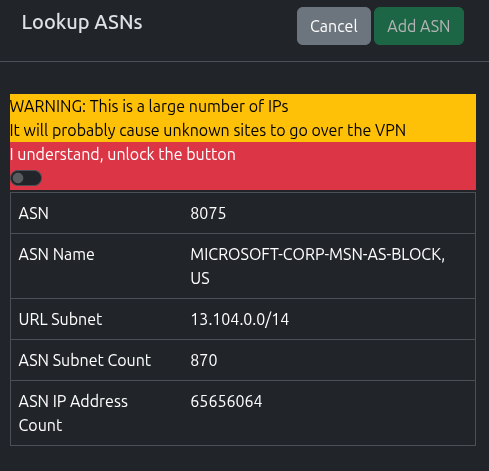
ASNs are an incredibly powerful tool, but there can be unseen problems caused by using a VPN to route them.
Consider them a last resort, and never add huge ASNs like those for Google/Amazon etc. You’ll end up routing anything on AWS etc over the VPN
Generally, if you’re unsure, never add an ASN, it won’t fix that one site that just won’t work
Every subnet on the internet is managed by an organisation. They’re grouped into Autonomous System Numbers (ASNs)
Occasionally, it can be useful to route an entire ASN over the VPN
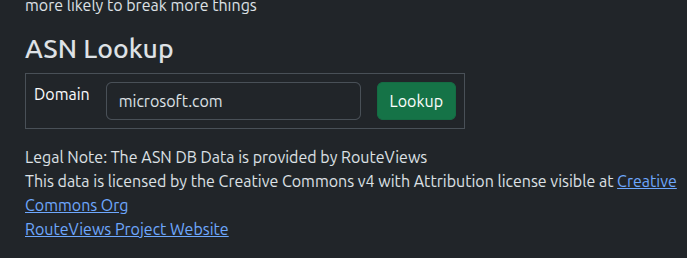
Looking up ASNs
The ASN page contains a lookup tool that can tell what ASN a site belongs to.
Simply enter the domain into the lookup form and click Lookup
Once the lookup is complete, you’ll be presented with the results, including a count of subnets and IP count.
3.7.6 - ASN Database
{% alert %}
Automatic download functionality is currently disabled to allow the beta to ship, it will be re-enabled when I can be certain it’ll work.
{% /alert %}
Recommended Settings: If you’re not using ASNs, you don’t need to worry about the ASN database, nd don’t worry about making sure you’ve got the latest version all the time.
The ASN database is downloaded from the Route Views project.
This project does amazing work in assembling this data, however there are sometimes problems downloading it (stalled/slow connections), which can stall out the worker container.
Updating the Database
If you would like to upgrade the database to a newer version, it can be performed as follows.
You will need the “pyasn” package from pip installed. this will provide three utility scripts.
Or, if you’re on a Linux system, it’s normally bundled with “python3-pyasn” package for your distro, and can just run these commands from the cli after installing it.
## Download the full rib file
pyasn_util_download.py --latestv4 --filename latest.rib

## Convert that file to a usable format
pyasn_util_convert.py --single latest.rib asn_db

## Download the ASN Names file
pyasn_util_asnames.py -o asn_names

## This will give you two files - asn_db and asn_names

## Get the name of your web docker container
docker ps
## Look for the container name similar to "synclias-web-1"

## Copy the files into the web container
docker cp asn_db synclias-web-1:/app/shared/
docker cp asn_names synclias-web-1:/app/shared/
That’s it! The server will automatically pick up the files when needed.
4 - Technical Details
4.1 - Components
Containers
Synclias in it’s running state consists of multiple containers, all with a specific purpose:
Container
Core Tech
Purpose
web
Gunicorn/Flask App
Web Interface
worker
Celery
Back end worker/Task execution
beat
Celery Redbeat
Dynamic Task Scheduler
redis
Redis
App/worker/beat task communications
db
MariaDB
Permanent storage
Networking
The containers will spin up two networks for communication:
Network
Containers
Purpose
redis_network
redis, web, worker, beat
db_network
db, web, worker, beat
Communications Ports
Source
Destination
Port
Notes
web, worker, beat
db
TCP 3306
Standard mariadb port
web, worker, beat
redis
TCP 6379
Standard redis port
Clients
web
TCP 8000
Service exposure to outside world
Persistent Storage
Docker volumes are used by default, modified as required
Container
Volume
Mount Point
Purpose
db
db_data
/var/lib/mysql
Primary Database
redis
redis
/data
Task Schedule/Storage
web, worker, beat
app_shared
/app/shared
Shares ASN Database between containers
4.2 - Emergency Backout
If, for some reason, you need to back out anything Synclias does, there’s only one (or two) places you need to modify, the aliases.
To Back out Everything:
Log into OPNsense
Go to Firewall -> Alias
Locate the VPN_Websites alias and edit it
Delete all of the IPs from in there and click Save
If you’ve got a VPN_Websites_IPv6 alias, do it there as well
Click Apply to apply the changes
Log into Synclias and turn off Auto-Sync if you’ve got it turned on
That’s it, promise, any changes Synclias made to the firewall are gone
4.3 - IPv6 Support
Let’s address the elephant in the room
At this time, IPv6 support for Synclias is in a beta status.
You can turn on IPv6 support, and with a configured alias, it will fill it up just fine, routing as needed, assuming you have a configured IPv6 VPN and functioning alias/firewall rules
Before I begin, let me start with declaring a posture:
IPv6 is the future, it’s coming/already here.
If you have it and it works, I don’t want people to turn it off, but it does present some unique issues, that I will deal with where I can, but there are places that the user will have to decide on some options.
The goal of Synclias has always been to make no changes to client devices if possible, and minimal changes to network setup where needed. It is possible to change a computer to prefer IPv4 over IPv6, but I’d rather find a better way around this.
The Main Issue
With a dual stack network (IPv4 and IPv6), you essentially have two potential paths to a server.
Most Operating Systems will prefer IPv6 if it’s configured and working properly.
Synclias can pretty reliably sort out IPv4 traffic. Sadly, if the OS is preferring IPv6, all of that is irrelevant, an IPv6 packet isn’t covered by IPv4 rules and runs through IPv6, essentially negating all the work Synclias does.
Looking at some of the issues here:
1. VPN Providers
Some VPN providers don’t provide IPv6 connectivity, only IPv4.
This isn’t a problem for them as they route everything over the VPN, so things can’t escape, traffic for IPv6 gets modified in a way that works for the IPv4 connectivity they provide.
However, there’s no real way that if your computer sends an IPv6 packet that I can catch it and route it down a VPN tunnel without doing some extra mapping etc that might break things even more.
Synclias could never be a “professional” product, because “Best Effort” isn’t the binary works or doesn’t work that anyone could reliably guarantee. It works perfectly for my use cases, but I’d never run a business relying on it working 24/7
Best Solution I can Offer for this:
Decreasing order of “good idea”:
Find a provider that will route IPv6 for you
Find a common way to configure DNS responses from your DNS server to be IPv4 where possible. If the DNS server gives back an IPv4 address, your device will use the IPv4 stack, and IPv6 is irrelevant - The option here for you is “Prefer IPv4” (Or unchecking “Prefer IPv6”)
I need to fully investigate 6rd or some other form of making OPNsense reliably route IPv6 over IPv4 VPNs
Ask users to only use sites that have IPv4 addresses. (This isn’t a thing, but I want to see how much I don’t want to suggest option 5)
Disable IPv6 on your router/device
IPv6 Subnets
These actually present a “good problem”.
IPv6 Subnets are the same as IPv4 in many ways, and different in others. With so many IPs being assigned to a company/service, doing DNS lookups for one server is actually rather inefficient. Since most companies at the moment have a /64 at least when it comes to subnets their IPs live it, there’s realistically scenarios where we don’t add the IP address, but rather discover the subnet and or just add a /64,/96/128 etc.
This would make the routing rules more efficient, and less likely for scenarios where a server moves, because it’ll be more likely that it’ll move to another address in that subnet. And i’m less concerned about over-scoping, because the IP subnets are so mind-blowing massive in IPv6 that the chances of accidentally including another company are tiny.
That said, it’s going to require some more research to come up with a reliable way to implement this, the back end support is already in Synclias, I just need to decide on some sensible defaults, most likely the default will be a strict mode of just the discovered IP, but I don’t want miss an opportunity to be prepared when a server changers from “1 to 2” in the last hex value of an IP address.
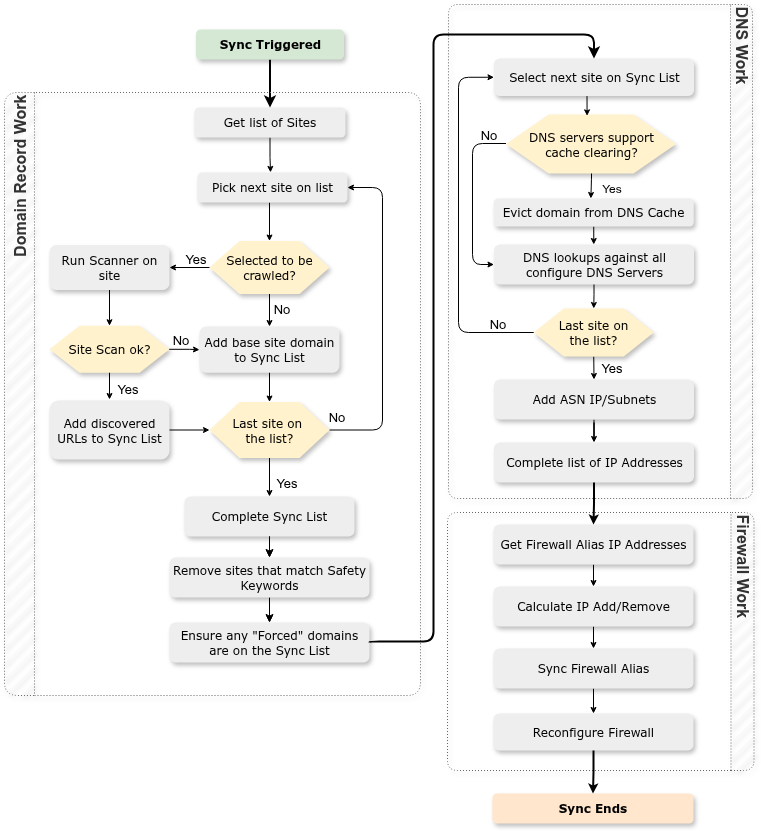
4.4 - Process Flow
The following diagram shows the process/decisions made by Synclias during a Sync.
4.5 - Technical People who say "This is dumb"
I get it
Before I go further, let’s discuss the key scope of what I want Synclias to do:
Provide a method where my home network automatically adjusts and routes some sites over a VPN with minimal steps for me
It most definitely does not:
Provide a guarantee that traffic won’t miss the VPN tunnel and get the site designed for your country
Provide any way of routing torrent etc clients, if you want that, dedicate an IP, and use it as a source for a dedicated firewall rule.
Misses and What Causes Them
Let’s term a site not getting routed over the VPN as a “Miss”, and there are a lot of scenarios that this could realistically cause misses:
The big one - a site moves IP, and Synclias doesn’t catch it before a client get there
Round Robin load balancing using IP addresses
CDNs that allocate out to hosts that have numerical values (e.g cdn34343.cdn.local, cdn343536.cdn.local) don’t really work with discovery
Short TTL’s make the IP capture process irrelevant after 5 minutes
Essentially, these boil down to two things:
Scenario 1- Discovery - this is a problem, and we’re only given the information in the DNS response/view that we get back. We may get a different view in the near future.
Scenario 2: Changes - Clients/Browsers will always follow spec (correctly) and migrate to the new IPs as per the usual TTL expiry etc, and Synclias won’t keep up until the next sync.
Whilst these are different scenarios, they do essentially come down to the same thing - the upstream DNS will be different in a shorter period than Synclias syncs
Follow the specs, but let’s apply the real world
Having said that, let’s look at some real world data here, my working theory from having done web hosting for years, is that sites don’t move IP that often, mainly because there are far easier alternatives to doing so. ( Mainly because TTLs/caching exist, which is a blessing to me and a curse to quick migrations.)
discord.gg - has had the same 5 A records since 2022
i.imgur.com - has moved IP once in 2025, and before that moved once in 2024
The big “p….hub” site has had the same IP since 2022
I fully understand that migrations do happen, there will be misses, but for most sites, migrations of IP addresses are relatively rare these days, and I’m willing to take a few misses every year.
That said, this isn’t designed for someone to run a business over. No promises, best effort.
Why do I think IPs are pretty stable?
With things like:
Blue/green deployments
Anycast
Elastic IPs etc
It’s far more common these days for your external IP to stay the same, but use a device behind it to manage the traffic migrations rather than DNS, because:
There’s far more granular control options than DNS provides
DNS propagation exists
TTLs generally don’t come into it (which is essentially 2, but slight different)
So, it’s far easier to migrate a site these days than by using DNS to do so, and the cost of a DNS screw up isn’t just that you need to roll it back, you need to wait for propagation etc, which means unreliability for your site for longer than necessary.
Let’s be honest, with Elastic IPs AWS charge per hour for an IP that doesn’t change, and people are happy to pay it.
As such, the only real time anyone changes IP address is when the easier options aren’t available.
IPv6
This is going to be an interesting one, companies have a lot more IPs available to choose from, so we might see more movement, originally I set this up as IPv4 only and thought IPv6 would be a nightmare, but frankly, it’s been fine, as long as people have a VPN that matches their single/dual stack.
Sticking to the specs
Back to DNS, my preference will always be what I do with Technitium if possible, kick out the DNS entry and refresh it, because I want the promise that a TTL gives, but we work with normal DNS as well because the Venn diagram of OPNsense/VPN/Technitium users that might find it helpful is probably a circle around me.
With regards to the assumption some have made that i’m trying to do something outside of the DNS specs, I’m not, I promise. No pinning, no hosts file entries etc, it’s better a site works with a miss than I do something stupid and start breaking people’s connectivity.
Obviously long TTL’s work better for Synclias, but a shorter TTL and a DNS change just means that the user will get routed through their normal connection, I’m not breaking sites in any way, I’m not extending TTLs, or fixing IPs at all.
So yeah, misses happen, but I’m happy to accept them a couple of times a year. The VPN client still works when you need it, or go click Sync.
A note on Kill-Switches
Sadly, as you can imagine, this isn’t really compatible with them network wide as I’m happy to accept the miss in terms of browsing, and since we follow instead of lead in terms of IP addressing, I can’t predict where a site’s going to move to.
I can see the use for a kill switch for certain use cases, anything you need to make sure that it has no chance to get over the normal internet.
But outside of that - my question is do you really need a kill switch for your main desktop? I think a lot of people see the cool term and want that, but for my use case, it’s just not necessary, if I was running most things that would need one, it’d be a dedicated host with it’s own kill switch.
Wrapping it up…
I appreciate if you decide it’s not for you, that’s fine, I appreciate that you took the time to read this, it’s a lot longer than I thought it would be.
4.6 - Justifying requested permissions
As Synclias asks for permissions on your router, these are the exact requested and why
OPNsense
Permission
Reason for Permission
Firewall: Alias
Listing Aliases on the Firewall. Needed for testing the Alias and reading the contents
Firewall: Alias - Edit
Adding/Removing IPs/Subnets from the Firewall Aliases
Diagnostics: PF Table IP addresses
Required to allow the calling of “Reconfigue Firewall” to apply the changes
Diagnostics: Show States
Sync option for clearing states, greatly improves test results rather than working around established sessions
Technitium
Permission
Reason for Permission
Cache - Delete
Removal of Cache records. They will be re-populated straight away as Synclias calls the DNS server
5 - OPNsense VPN Config
5.1 - Part 1 - Preparation
Note
Sadly, the VPN part is one of the first steps, and one of the hardest
There’s Youtube video’s out there if you prefer that can walk you through it all, however, their NAT/Firewall setup will be different than what Synclias needs, so make sure to come back and do Part 3.
Mullvad is used as the example here, however any provider that gives a wireguard configuration file will work pretty much the same way. The main point of note is whether they support IPv6 or not. If this isn’t supported, please see the Advanced section for some suggestions.
Assuming at this point you have a Mullvad account and nothing else, the steps are as follows:
Part 1 - Preparation
Get the Config file for your VPN
Edit the file slighty to put the data in the right format
Work out the Gateways
Part 2 - Configuring the VPN on OPNsense:
Create a Wireguard Instance on OPNsense
Create a Wireguard Peer on OPNsense
Confirm the Tunnel is working
Part 3 - Adding an Interface and Gateway
Adding an Interface
Adding Gateways
Confirm the Gateways work
Part 4 - Configuring Traffic across the VPN
Creating the Aliases
Create NAT rules
Create the Firewall Rules
Prep Work
Generate your Private Key and Config File
If you don’t have a Wireguard VPN config file, you’ll need to make one.
For Mullvad the instructions to create one are as followsl
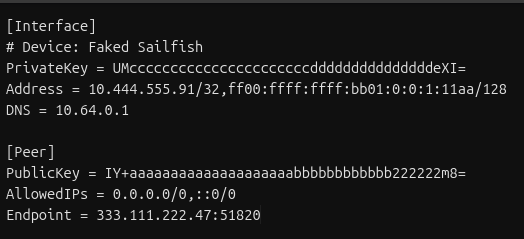
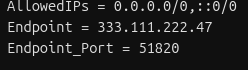
In the Range section, you’ll see two IP addresses:
One is the IP address you pasted in (check the last digits here - “11aa”)
The other is your IPv6 Gateway - example: ff00:ffff:ffff:bb01:0:0:1:11ab
They may look a little different (extra 0’s and :’s), this is fine
If you only get one IP in “Range” - did you change the /128 to /127 as required ?
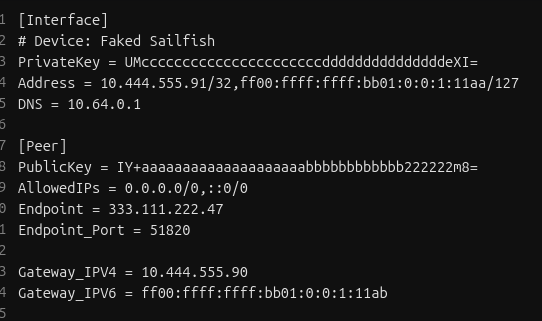
Add a line to your config file:
Gateway_IPV6 = « Paste your gateway in here »
You’ll end with a file that looks like this:
That’s it! The hard part’s over, get ready for some copy/paste
5.2 - Part 2 - Wireguard Instance and Peers
Configuring the VPN on OPNsense
In this section a Wireguard Instance and Peer will be configured on OPNsense,
This essentially forms a virtual cable from your router to VPN.
Create a Wireguard Instance
Log into OPNsense via the web interface
In the sections browse to VPN -> Wireguard -> Instances
Click + to configure a new Instance
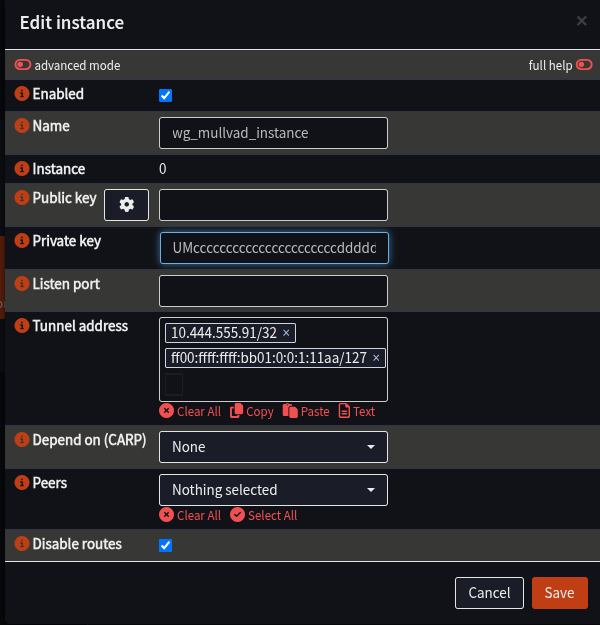
Fill in the details as follows (anything not listed should be left blank)
Field
Value
Notes
Name
wg_mullvad_instance
Private Key
Interface.PrivateKey from Wireguard file
Tunnel Address
Interface.Address from Wireguard file
/127, not 128
Disable Routes
Ticked
Click Save to close the window, you should see the Instance appear
Click Apply to load the instance into Wireguard
Create a Wireguard Peer
Here the peer of the VPN will be configured for the instance to connect to.
Ensure the Web Interface is at VPN -> Wireguard -> Instances
Select the Peers tab
Click “+” to configure the peer
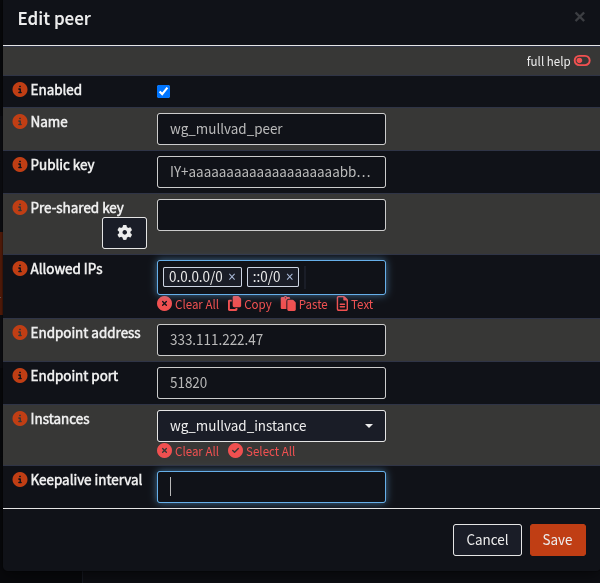
Fill in details as follows:
Field
Value
Notes
Name
wg_mullvad_peer
Public Key
Peer.PublicKey from Wireguard file
Allowed IPs
Peer.AllowedIPs from Wireguard file
Endpoint
Endpoint from Wireguard file
e.g. 333.111.222.47
Endpoint Port
Endpoint_Port from Wireguard file
Most likely: 51820
Instance
wg_mullvad_instance
Click Save to close the window
Click Apply to load the peer into Wireguard
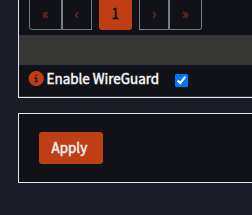
Enable Wireguard and confirm the Tunnel is working
Navigate to VPN -> Wireguard -> Instances
Tick the box next to Enable Wireguard
Click Apply
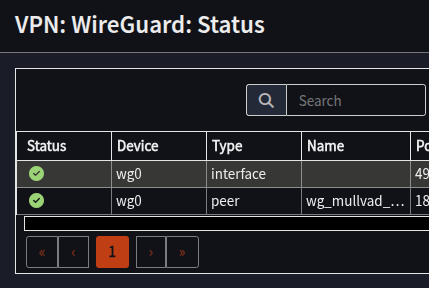
Navigate to VPN -> Wireguard -> Status
Confirm Status has green ticks next to the two lines for your peer and an interface with the same Device Name as your peer (e.g. “wg0”, yours may differ)
At this point, the VPN is configured, the tunnel is up, we’ve essentially connected a cable from the router to the VPN provider. It can’t be used yet as the router doesn’t know what to do with your traffic.
Next step is to configure the Interface and Gateways.
Troubleshooting
If you don’t have green ticks:
Have a look in VPN -> Wireguard -> Log File to see if there is more information as to what’s gone wrong, and double check the instance and peer configuration.
Restart the Wireguard service:
Visit Lobby -> Dashboard
Scroll down to Services
Locate WireGuard wg_mullvad_instance
Click Restart next to it
If you have one green tick and a grey question mark:
Check your Tunnel Address for the instance has “/127” in it and not “/128”
With all this complete, proceed to Part 3 - Interface and Gateways
5.3 - Part 3 - Interface and Gateway
This is Part 3 of the VPN configuration.
Following the cable analogy, we now need to add the network card (Interface), and give it an IP address so we can talk to it (Gateway)
This section will:
Create an Interface for the VPN
Add Gateway(s) to the Interface to allow traffic routing
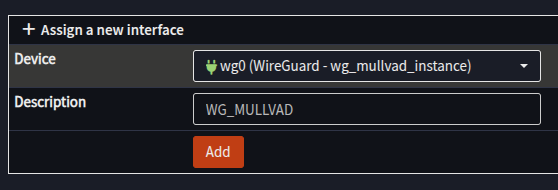
Create the Interface
Navigate to Interfaces -> Assignments
In the Assign a new Interface section ensure the wg_mullvad_instance is selected
Enter a Description e.g. - WG_MULLVAD
Click Add
[WG_MULLVAD] should appear in the left hand menu
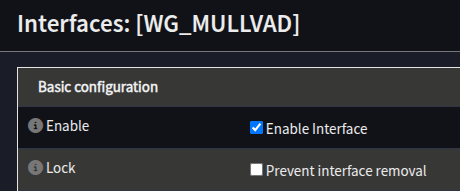
Select the [WG_MULLVAD] interface
Tick Enable Interface
Set the MTU and MSS to 1420
Click Save
At the top of the screen a message will appear, click Apply Changes
Creating the IP Gateway(s)
Next, our Gateway IPs will be configured on the new Interface:
Navigate to Interfaces -> Gateway
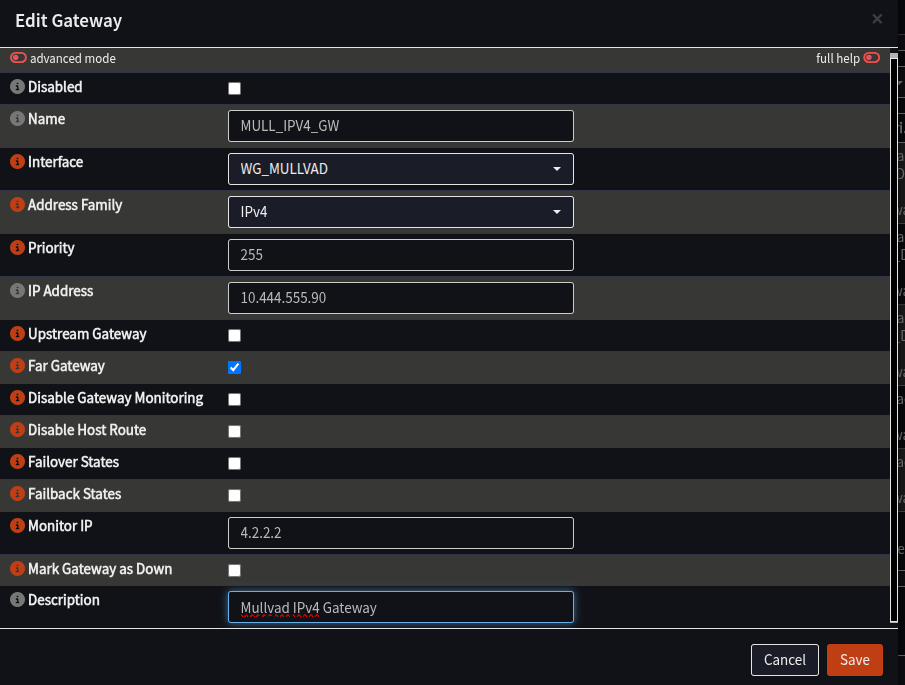
Click + to add a new Gateway
Fill in the form as follows:
Field
Value
Notes
Name
MULL_IPV4_GW
Anything you prefer, but will be needed later
Interface
WG_MULLVAD
Address
Gateway_IPV4 from Wireguard config
Just the IP, no “/32”
Far Gateway
Checked
Disable Monitoring
Unchecked
Monitoring IP
4.2.2.2
Any IP on the internet to test with, suggest 4.2.2.2
Description
Mullvad IPv4 Gateway
Any description you like
Click Save
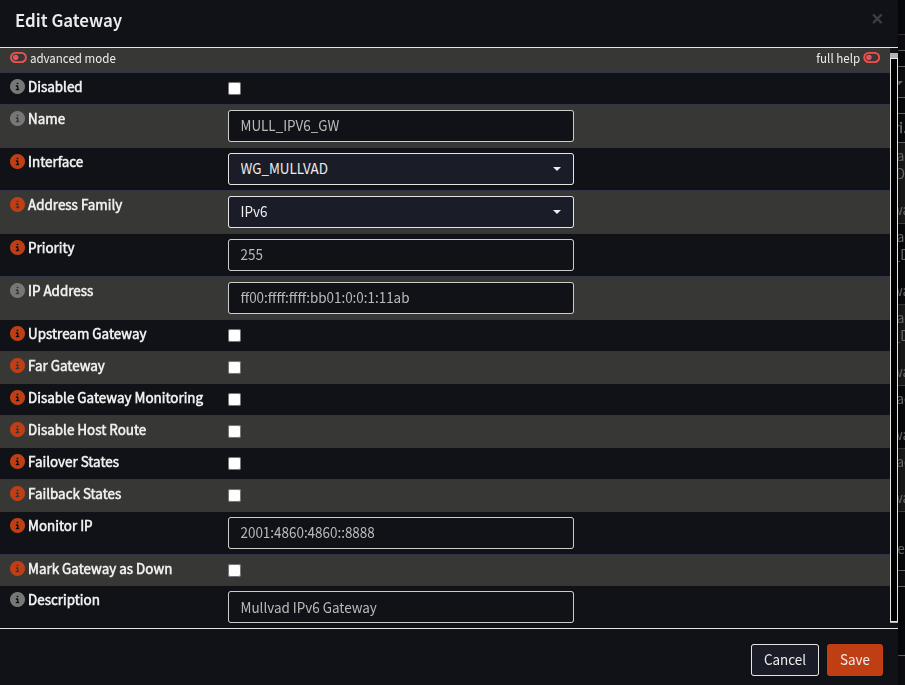
If you have an IPv6 in your config file, repeat the process to add another gateway, but this time: (Skip this step if there is no IPv6 in your config file)
Field
Value
Notes
Name
MULL_IPV6_GW
Same as above, but with IPv6
Interface
WG_MULLVAD
Address Family
IPv6
Address
Gateway_IPv6 from config file
No /127 or /128, just the IP
Far Gateway
Unchecked
Disable Monitoring
Unchecked
Monitor IP
2001:4860:4860::8888
Any IPv6 Address, example is Google DNS
Description
Mullvad IPv6 Gateway
Any description you like
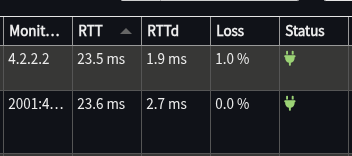
Click Apply at the bottom of the screen
Wait at the Overview screen for about about 15-30 seconds to start monitoring
Click Refresh
You should see both new Gateways with a green Status, and a time in ms in the “RTT” column:
If the Status is fine, this section is complete. The VPN is connected and now has a way to send traffic over it.
The final part is to configure the firewall/NAT to allow and send traffic that way, which takes place in part 4.
5.4 - Part 4 - Aliases, NAT and Firewall
At this point, the connection is up, there’s an IP address on it, this section will set up rules to allow traffic from internal networks to be sent across the VPN.
It will configure:
Alias group(s) that will hold the IP/Networks of servers to pass over the VPN
Outbound NAT rules to modify traffic so it can go over the VPN
Firewall rules to specify what traffic to configure
Creating the Aliases
Navigate the Web Interface to Firewall -> Aliases
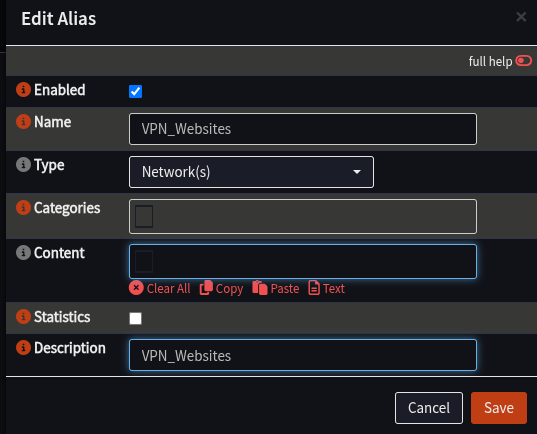
Click + to add an Alias
Add an alias as follows:
Field
Value
Notes
Name
VPN_Websites
Can change, but this is highly recommended
Type
Networks
Description
VPN_Websites
Click Save
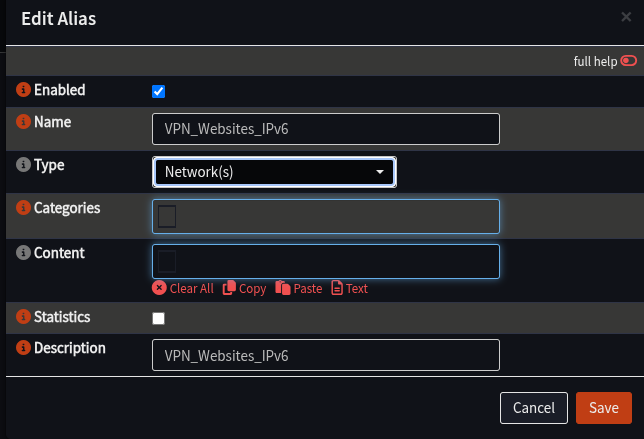
Click + to add a new Alias for IPv6 if needed:
Field
Value
Notes
Name
VPN_Websites_IPv6
Same comment about spaces as above
Type
Networks
Description
VPN_Websites_IPv6
Click Save
Click Apply
Creating a NAT Rule
These rules will inspect traffic coming into the router, and if it should be sent over the VPN, it will change the packet to suit to one of the VPN gateways that has been configured
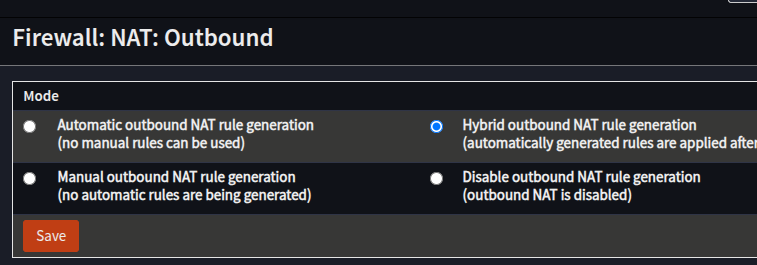
Configure OPNsense to Allow Manual NAT Rules
Navigate to Firewall -> NAT -> Outbound
In the Mode section, select Hybrid outbound NAT rule generation
Click Save
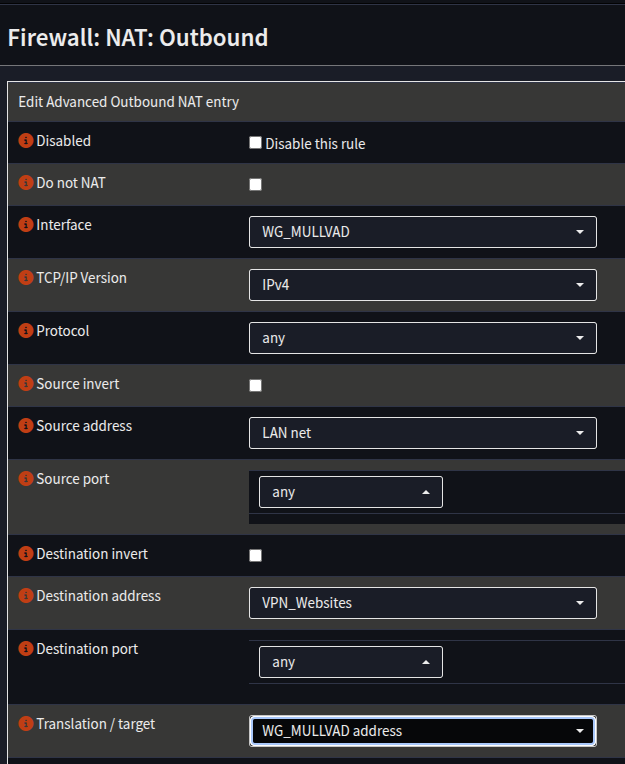
Make the NAT Rules
Ensue the Web Interface is at Firewall -> NAT -> Outbound
In the Manual Rules section, click +
Create a rule for IPv4 as follows:
Field
Value
Notes
Interface
WG_MULLVAD
TCP/IP Version
IPv4
Source Address
Your Internal Network - LAN net/INT net etc
Destination Address
VPN_Websites
Translation/Target
WG_MULLVAD address
Click Save
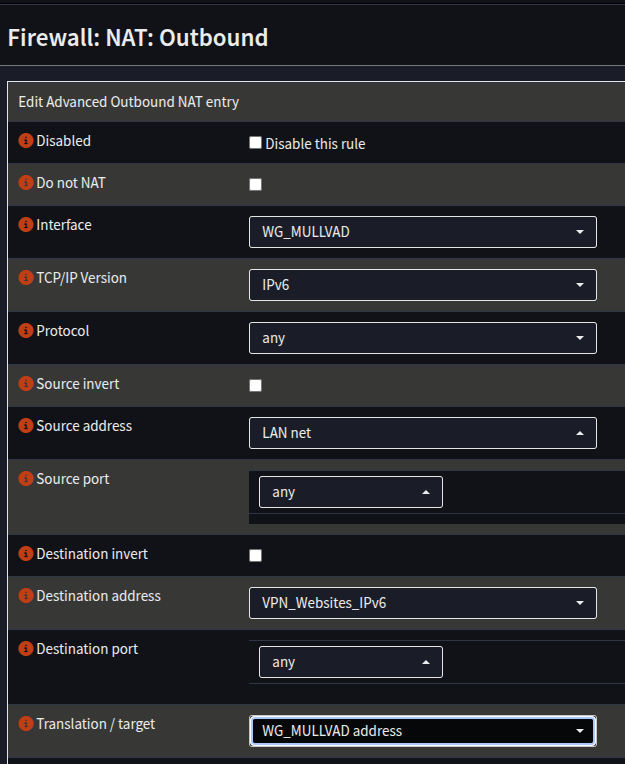
Create another rule for IPv6 if using IPv6:
Field
Value
Interface
WG_MULLVAD
TCP/IP Version
IPv6
Source Address
Your Internal Network - LAN/INT etc
Destination Address
VPN_Websites_IPv6
Translation Target
WG_MULLVAD address
6. Click Save
7. Click Apply
Firewall Rules
If you have the default firewall rules deployed, traffic will be allowed from your LAN out by default, and no configuration will be required.
This section will set up rules to allow all traffic across the VPN, **you may wish to restrict it further, e.g port selection
This will configure a specific rule for the aliases, and assumes nothing else is in place.
Please note: you will need to places these rules above any relevant denies, if you are running custom rules, knowledge of how to do this is assumed.
Navigate to Firewall -> Rules -> LAN
Click + to add a new rule
Add a Rule as follows:
Field
Value
Notes
Action
Pass
Quick
Checked
Interface
LAN
TCP/IP Version
IPv4
Source
LAN net
Destination
VPN_Websites
Gateway
MULL_IPV4_GW
Click Save
Repeat the process, but for IPv6:
Field
Value
Notes
Action
Pass
Quick
Checked
Interface
LAN
TCP/IP Version
IPv6
Source
LAN net
Destination
VPN_Websites_IPv6
Gateway
MULL_IPV6_GW
Click Save
Click Apply
That’s it, all the configuration is done for Synclias networking
Testing Connectivity before using Synclias
If you’d like to test the VPN connectivity, you can route all of your traffic over the VPN :
Edit the NAT rules to remove the relevant “VPN_Websites” alias and apply your changes.
Test with either a “curl api.ipify.org” or whatever “What is my IP address” site you like
Remember to put the VPN Website alias back in when done!
6 - Roadmap
Milestone Features
There’s a lot of extra features, some small, some large, to add to Synclias.
Of this list, these are considered required for V1:
Flush State changes
New API exposure
Envar token loading
Encryption key cycling
Logging improvements
Change from Ajax to Websockets for reporting
GUI stability (too many things move about)
A few know and badly implemented/inconsistent function returns/internal logic
Here are some thoughts on them:
Flush State Changes
This is top of the list
At the moment, Flush State clears the state table of the firewall.
It should only be necessary to drop any established connection to a VPN’d IP.
However, the OPNsense docs are a little confusing on this: “del_state” should take “$stateid,$creatorid”, however querying the state just gives “id”
It appears from looking through some forum posts that the code is in OPNsense to drop by IP, but more than a little obfuscated.
API Exposure
There is an internal API that the website etc uses, but it’s not self documenting/accessible at this time. A newer, swagger documented API is already partially complete but disabled.
Envar Loading of Tokens/Keys
Given it’s Docker, loading any of the tokens/keys should ideally be by Envar. Migration shouldn’t be overly difficult, but the app was built one way, I just need to make sure they’re available in the right places
Cycling Encryption Keys
Any token/api keys are encrypted in the database, however there’s no real way to rotate the keys. Just need to develop a method to read in new keys and rotate without risk
Logging Improvements
Currently, all logging is console only on the background worker and app. This functions fine for reviewing an individual sync, but historical data might be useful.
All of the components are in there for centralising for human review on the site, and the syncer collects them all but at this time, other things have been higher priority. They just need putting into the database, and a page for reading them easily adding
Improved IPv6 Support
IPv6 works, and seems fine, but I can already see people having problems with IPv6 connections only configuring IPv4 and telling me it doesn’t work. Not sure how to deal with that really, detecting that IPv6 is there is easy. I’ve got some docs to read about tunnelling.
Also, having support to recognise when something’s supplying IPs from a dedicated pool. Facebook like to put “f4c3b00” in their IPv6 addresses, and I’ve seen it in other places too, spotting these (without a preconfigured list) shouldn’t be too difficult, and then we just add anything with that tag into the VPN. It’s just an extra wrapper on the IPv6 part, but takes time to not screw up and overly force an entire datacenter through the VPN.
DNS Record Tracking
The only major thing really that breaks Synclias is CDNs with rotating IPs. It’s a good setup and if I was hosting it’s an option I’d consider. Whilst Synclias does pull as many IPs as possible during a scan, keeping historical data on these would be beneficial.
Also, would potentially be a side benefit of improved logging.
Need an option to track the IPs, decide on a retention period, actually doing the code should be easy
GUI Improvements
Bulk Site Imports
Already have a bulk importer in there, just need to expose it
List sorting
Shouldn’t be too difficult, just need to add a parameter to allow the GET to control the DB query
Websockets
Yeah, I know
Raw Subnet/IP
This is more “people think it should be there”, but really, if you’ve got an IP that needs permanent addition, the right place for it isn’t in a dynamic firewall alias, it should be in it’s own on the router.
7 - Learnings from Development
It’s not yet finished, there’s lot of work to do.
However, there’s always learning to do.
As stated, originally this started as a personal python script and grew rapidly.
I gave myself two weeks for a personal sprint to do as much as I could outside of looking for a job.
Some of the bits are cobbled together from examples/docs, it’s why the returns from some functions are inconsistent. I want to be clear that there’s no AI in any of this, whilst it’s a useful tool for some things, I think having it paste over a knowledge gap just leads to problems when you can’t explain why something does what it does and you’ve hit it’s limits.
Having got this far, what should I do differently?
Start with the API and docs
Technically I did this, it’s all based on GET/PUT etc, with data models and follows REST
However, adding Marshmallow and the API docs has proven a little incompatible (Schemas vs Models etc and duplicating data), this is mainly a skill issue on my part and an assumption that I could bolt it on top.
I started with Blueprints etc, and it’s all modular, apart from Core, which should have a clearer designed boundary on it’s purpose as there’s a couple of leaks
I know Python and SQL, Docker, I’ve made build pipelines, but I didn’t know that much Javascript, much about Alembic or any Bootstrap stuff, that’s been a lot of tech all at once
I’m a terrible web designer, those people work magic
Thing’s it’s re-inforced in me:
I genuinely love having a problem to fix with tech
End users can break anything, leading them without being there is still an incredibly useful skill.
MVP is still vital, there’s stuff in here that doesn’t need to be, this was originally a 2 week best effort sprint project,
8 - Legal Bits
To be clear, Synclias is not associated with any way with any of the sites/domains covered in the docs/videos.


 5. Click Save
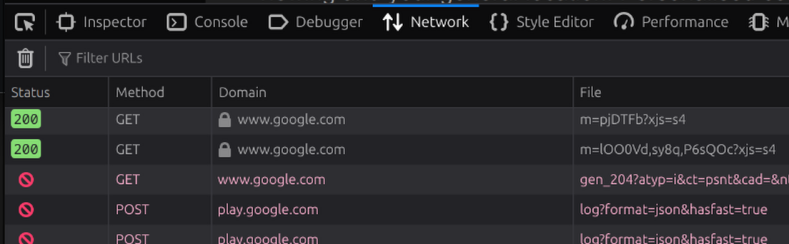


 6. Click Save
7. Click Apply
6. Click Save
7. Click Apply