VPN Part 1 - Wireguard Instance and Peers
Note
Sadly, the VPN part is one of the first steps, and one of the hardest
There’s Youtube video’s out there if you prefer that can walk you through it all, however, their NAT/Firewall setup will be different than what Synclias needs, so make sure to come back and do Part 3.
Mullvad is used as the example here, however any provider that gives a wireguard configuration file will work pretty much the same way. The main point of note is whether they support IPv6 or not. If this isn’t supported, please see the Advanced section for some suggestions.
Assuming at this point you have a Mullvad account and nothing else, the steps are as follows:
- Part 1 - Configuring the VPN on OPNsense:
- Create a Wireguard Instance on OPNsense
- Create a Wireguard Peer on OPNsense
- Confirm the Tunnel is working
- Part 2 - Adding an Interface and Gateway
- Adding an Interface
- Adding Gateways
- Confirm the Gateways work
- Part 3 - Configuring Traffic across the VPN
- Creating the Aliases
- Create NAT rules
- Create the Firewall Rules
Pre-req: Generate your Private Key and Config File
If you don’t have a Wireguard VPN config file, you’ll need to make one. For Mullvad the instructions to create one are as followsl
- Head over to the Mullvad Account Page
- Press the Generate Key button and save the key that appears
- Scroll down to the selection of endpoints
- Pick and endpoint you want to appear from
- Pick a city if offered (Any is fine)
- Pick one of the selected connections (Any is fine)
- Ignore the Content Blocking section
- Click Download File
Open the file up and you’ll see settings like this:
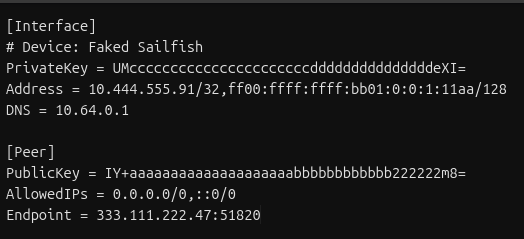
Generating all the Info you need
First, make a copy of the file, we’ll need to edit some things to make the setup easier. We’ll do it all now so that everything else is copy/paste
1. Change the Address Line /128 to /127
This is a critical step, we need to put the IPv6 in a network that can talk to it’s Gateway, so change /128 at the end of the address line to /127
It’ll look like this:
changed-address-line

Not doing this step will result in your router not knowing what to do with any traffic you give it
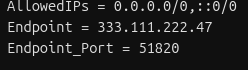
2. Split the Endpoint Line
The endpoint line will contain an IP address and a port, divided by a “:” sign
- Make a new line, and start it with “Endpoint_Port = "
- Copy the port number from the Endpoint line to the new line
- Delete the “:” from the Endpoint line
It’ll end up looking like this:
3. Calculate your Gateway IPs
Before you do anything else:
Critical Step
- Change the /128 in the address line to /127
During the setup, these will be referred to in the form “Interface.DNS from Wireguard File” etc.
From the example here, Interface.DNS from Wireguard File would be 10.64.0.1
Endpoint
During the configuration, you’ll need to split “Peer.Endpoint” at the “:” symbol.
E.g. Peer.Endpoint of “333.111.222.47:51820” gives:
- Endpoint 333.111.222.47
- Endpoint Port 51820
Configuring the VPN on OPNsense
In this section Wireguard will be configured on OPNsense, and a peer configured for that instance to connect to, forming the VPN tunnel.
Create a Wireguard Instance
- Log into OPNsense via the web interface
- In the sections browse to VPN -> Wireguard -> Instances
- Click + to configure a new Instance
- Fill in the details as follows (anything not listed should be left blank)
| Field | Value | Notes |
|---|---|---|
| Name | wg_mullvad_instance | |
| Private Key | “Interface.PrivateKey from Wireguard file” | |
| Tunnel Address | “Interface.Address from Wireguard file” | |
| Disable Routes | Ticked | |
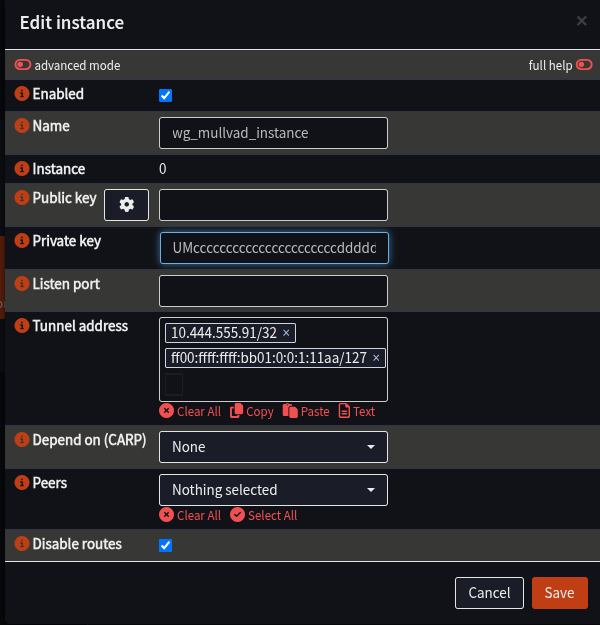 |
- Click Save to close the window, you should see the Instance Appear
- Click Apply to load the instance into Wireguard
Create a Wireguard Peer
Here the target of the VPN will be configured for the instance to connect to
- Ensure the Web Interface is at VPN -> Wireguard -> Instances
- Select the Peers tab
- Click “+” to configure the peer
- Fill in details as follows:
| Field | Value | Notes |
|---|---|---|
| Name | wg_mullvad_peer | |
| Public Key | Peer.PublicKey from Wireguard file | |
| Allowed IPs | Peer.AllowedIPs from Wireguard file | |
| Endpoint | IP address from Peer.AllowedIPs from Wireguard file | e.g. 333.111.222.47 |
| Endpoint Port | Port from Peer.AllowedIPs from Wireguard file | Most likely: 51820 |
| Instance | wg_mullvad_instance | |
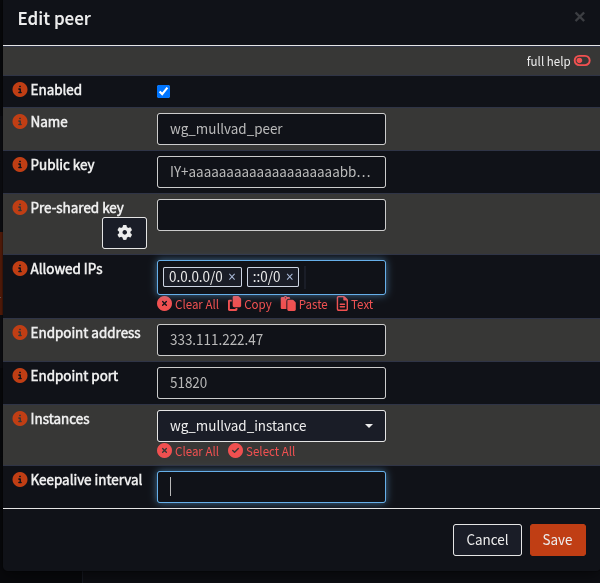 |
- Click Save to close the window
- Click Apply to load the peer into Wireguard
Enable Wireguard and confirm the Tunnel is working
- Navigate to VPN -> Wireguard -> Instances
- Tick the box next to Enable Wireguard
- Click Apply
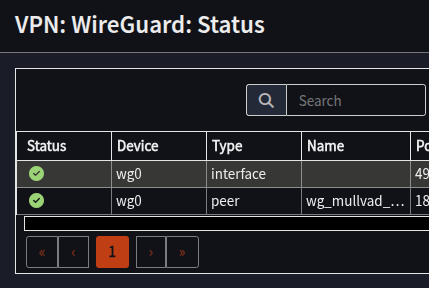
- Navigate to VPN -> Wireguard -> Status
- Confirm Status has green ticks next to the two lines for your peer and an interface with the same Device Name as your peer (e.g. “wg0”, yours may differ)
At this point, the VPN is configured, the tunnel is up, we’ve essentially connected a cable from the router to the VPN provider. It can’t be used yet as the router doesn’t know what to do with your traffic.
Next step is to configure the Interface and Gateways.
Troubleshooting
If you don’t have green ticks:
- Have a look in VPN -> Wireguard -> Log File to see if there is more information as to what’s gone wrong, and double check the instance and peer configuration.
- Restart the Wireguard service:
- Visit Lobby -> Dashboard
- Scroll down to Services
- Locate “WireGuard wg_mullvad_instance”
- Click “Restart next to it”
You may have green ticks after a service restart, but one changes to a “Grey ?”, this is fine, you’ll need some traffic over it to keep it at a green tick. As long as it’s not a “Red X”, you can proceed.
With all this complete, proceed to Part 2 - Interface and Gateways