Part 1 - Preparation
Categories:
Note
Sadly, the VPN part is one of the first steps, and one of the hardest
There’s Youtube video’s out there if you prefer that can walk you through it all, however, their NAT/Firewall setup will be different than what Synclias needs, so make sure to come back and do Part 3.
Mullvad is used as the example here, however any provider that gives a wireguard configuration file will work pretty much the same way. The main point of note is whether they support IPv6 or not. If this isn’t supported, please see the Advanced section for some suggestions.
Assuming at this point you have a Mullvad account and nothing else, the steps are as follows:
- Part 1 - Preparation
- Get the Config file for your VPN
- Edit the file slighty to put the data in the right format
- Work out the Gateways
- Part 2 - Configuring the VPN on OPNsense:
- Create a Wireguard Instance on OPNsense
- Create a Wireguard Peer on OPNsense
- Confirm the Tunnel is working
- Part 3 - Adding an Interface and Gateway
- Adding an Interface
- Adding Gateways
- Confirm the Gateways work
- Part 4 - Configuring Traffic across the VPN
- Creating the Aliases
- Create NAT rules
- Create the Firewall Rules
Prep Work
Generate your Private Key and Config File
If you don’t have a Wireguard VPN config file, you’ll need to make one. For Mullvad the instructions to create one are as followsl
- Head over to the Mullvad Account Page
- Press the Generate Key button and save the key that appears
- Scroll down to the selection of endpoints
- Pick and endpoint you want to appear from
- Pick a city if offered (Any is fine)
- Pick one of the selected connections (Any is fine)
- Ignore the Content Blocking section
- Click Download File
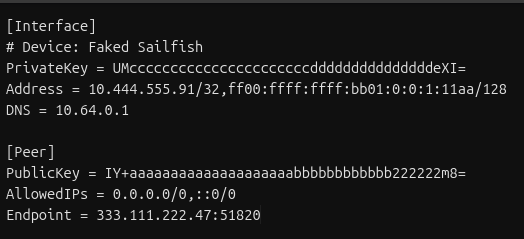
Open the file up and you’ll see settings like this:
Generating all the Info you need
This is the hard part. We’re going to do any working out that we need to do before we start touching the router.
Once this is done, everything else is copy/paste
First, make a copy of the file, we’ll need to edit some things to make the setup easier.
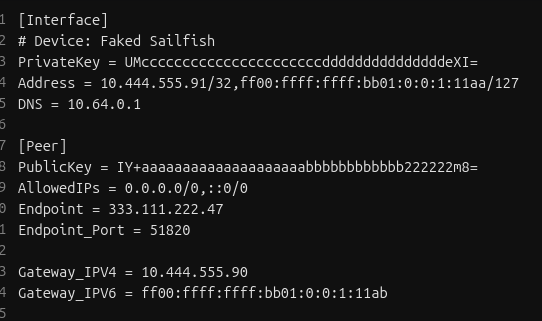
1. Change the Address Line /128 to /127
In the Address line, change /128 at the end of the address line to /127 :

Not doing this step will result in your router not knowing what to do with any traffic you want to send over the VPN
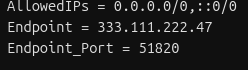
2. Split the Endpoint Line
The endpoint line will contain an IP address and a port, divided by a “:” sign
- Make a new line, and start it with “Endpoint_Port = "
- Copy the port number from the Endpoint line to the new line
- Delete the “:” from the Endpoint line
3. Calculate your Gateway IPs
Your config file may not contain an IPv6 address
Calculating Gateway Examples
Both IPv4 and IPv6 examples will use this line as their base:
Address = 10.444.555.91/32,ff00:ffff:ffff:bb01::1:11aa/127
IPv4 Gateway
Easy one - subtract 1 from the last number in the IPv4 address
Example - IPv4 address (10.444.555.91) gives the Gateway - 10.444.555.90
- Add a line to your config file:
- Gateway_IPV4 = « Your calculated address »
IPv6 Gateway
IPv6 can be a little more complicated, but:
- Take the full address, including the /127 (e.g.ff00:ffff:ffff:bb01::1:11aa/127)
- Find a tool to calculate the subnet (e.g Subnetting Practice.com)
- Paste in the full address and click calculate

- In the Range section, you’ll see two IP addresses:
- One is the IP address you pasted in (check the last digits here - “11aa”)
- The other is your IPv6 Gateway - example: ff00:ffff:ffff:bb01:0:0:1:11ab
- They may look a little different (extra 0’s and :’s), this is fine
- If you only get one IP in “Range” - did you change the /128 to /127 as required ?
- Add a line to your config file:
- Gateway_IPV6 = « Paste your gateway in here »
You’ll end with a file that looks like this:
That’s it! The hard part’s over, get ready for some copy/paste