Part 4 - Aliases, NAT and Firewall
Categories:
At this point, the connection is up, there’s an IP address on it, this section will set up rules to allow traffic from internal networks to be sent across the VPN.
It will configure:
- Alias group(s) that will hold the IP/Networks of servers to pass over the VPN
- Outbound NAT rules to modify traffic so it can go over the VPN
- Firewall rules to specify what traffic to configure
Creating the Aliases
- Navigate the Web Interface to Firewall -> Aliases
- Click + to add an Alias
- Add an alias as follows:
| Field | Value | Notes |
|---|---|---|
| Name | VPN_Websites | Can change, but this is highly recommended |
| Type | Networks | |
| Description | VPN_Websites |
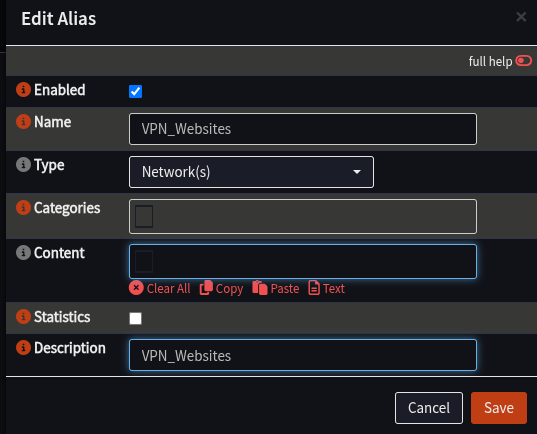
- Click Save
- Click + to add a new Alias for IPv6 if needed:
| Field | Value | Notes |
|---|---|---|
| Name | VPN_Websites_IPv6 | Same comment about spaces as above |
| Type | Networks | |
| Description | VPN_Websites_IPv6 |
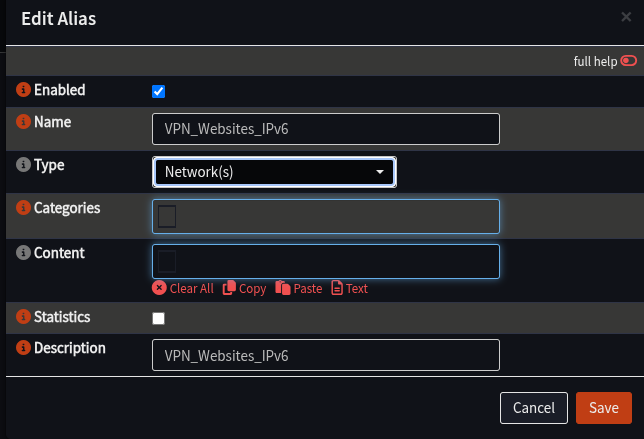
- Click Save
- Click Apply
Creating a NAT Rule
These rules will inspect traffic coming into the router, and if it should be sent over the VPN, it will change the packet to suit to one of the VPN gateways that has been configured
Configure OPNsense to Allow Manual NAT Rules
- Navigate to Firewall -> NAT -> Outbound
- In the Mode section, select Hybrid outbound NAT rule generation
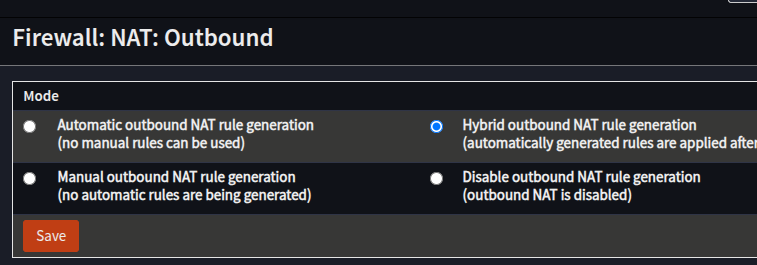
- Click Save
Make the NAT Rules
- Ensue the Web Interface is at Firewall -> NAT -> Outbound
- In the Manual Rules section, click +
- Create a rule for IPv4 as follows:
| Field | Value | Notes |
|---|---|---|
| Interface | WG_MULLVAD | |
| TCP/IP Version | IPv4 | |
| Source Address | Your Internal Network - LAN net/INT net etc | |
| Destination Address | VPN_Websites | |
| Translation/Target | WG_MULLVAD address |
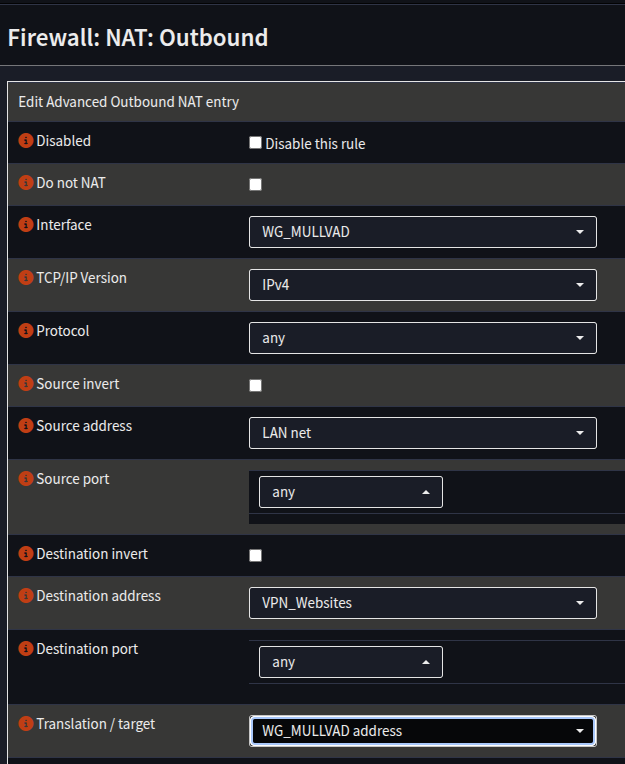
- Click Save
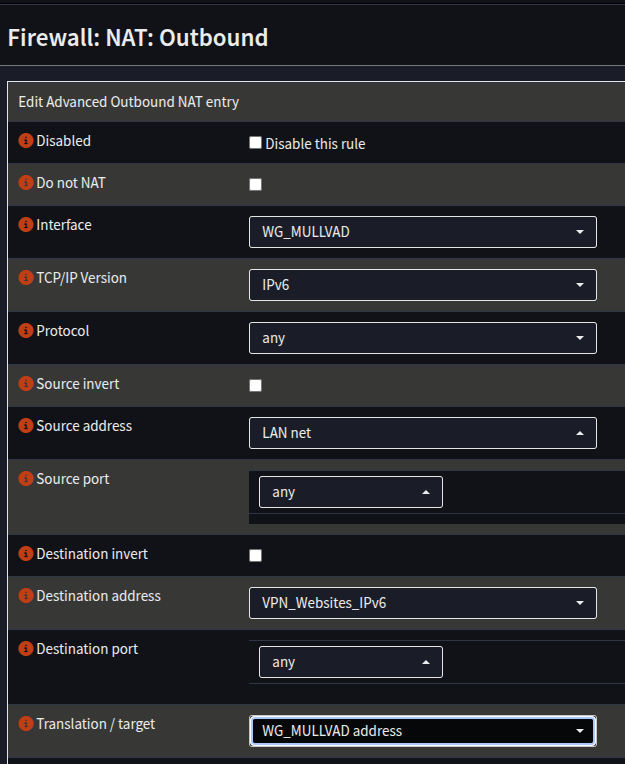
- Create another rule for IPv6 if using IPv6:
| Field | Value |
|---|---|
| Interface | WG_MULLVAD |
| TCP/IP Version | IPv6 |
| Source Address | Your Internal Network - LAN/INT etc |
| Destination Address | VPN_Websites_IPv6 |
| Translation Target | WG_MULLVAD address |
 6. Click Save
7. Click Apply
6. Click Save
7. Click Apply
Firewall Rules
If you have the default firewall rules deployed, traffic will be allowed from your LAN out by default, and no configuration will be required.
This section will set up rules to allow all traffic across the VPN, **you may wish to restrict it further, e.g port selection
This will configure a specific rule for the aliases, and assumes nothing else is in place. Please note: you will need to places these rules above any relevant denies, if you are running custom rules, knowledge of how to do this is assumed.
- Navigate to Firewall -> Rules -> LAN
- Click + to add a new rule
- Add a Rule as follows:
| Field | Value | Notes |
|---|---|---|
| Action | Pass | |
| Quick | Checked | |
| Interface | LAN | |
| TCP/IP Version | IPv4 | |
| Source | LAN net | |
| Destination | VPN_Websites | |
| Gateway | MULL_IPV4_GW |
- Click Save
- Repeat the process, but for IPv6:
| Field | Value | Notes |
|---|---|---|
| Action | Pass | |
| Quick | Checked | |
| Interface | LAN | |
| TCP/IP Version | IPv6 | |
| Source | LAN net | |
| Destination | VPN_Websites_IPv6 | |
| Gateway | MULL_IPV6_GW |
- Click Save
- Click Apply
That’s it, all the configuration is done for Synclias networking
Testing Connectivity before using Synclias
If you’d like to test the VPN connectivity, you can route all of your traffic over the VPN :
- Edit the NAT rules to remove the relevant “VPN_Websites” alias and apply your changes.
- Test with either a “curl api.ipify.org” or whatever “What is my IP address” site you like
- Remember to put the VPN Website alias back in when done!